by abduzeedo
Hello everyone from Abduzeedo!If you are anything like me, you have this site in your regular reading list for inspiration.I've been so inspired by so many things here, that I thought it would be good to share a few things back with the world.I talked to the very nice Fabio here at Abduzeedo, and he thought a light version of my photo art tutorial would be fun for a guest post.
Trey Ratcliff - www.stuckincustoms.com
So, this is really a short version of the big tutorial here on my blog, which you may or may not enjoy if you had any inkling of linking.
You should note that this is not really JUST an HDR tutorial.The process begins with that, but ends with significant steps thereafter.If you have seen HDR photographs, then you probably have noticed how many of them are kinda rough on the eyes.I've evolved (and continue to) a new technique to bring these full circle back into something that "feels" more right to me.
What is HDR?
HDR is short for High Dynamic Range. It is a software technique of taking either one image or a series of images, combining them, and adjusting the contrast ratios to do things that are virtually impossible with a single aperture and shutter speed.Most of the images in "Your Top 100 Favorites" are HDR, so you can take a look there if you want to see more examples than in this tutorial.
I will post a few interesting HDR photographs that I have taken that people seem to like.This one immediately beneath has the honor of being the first HDR photo every to hang in the Smithsonian Museum in Washington DC. I think this goes to show how mainstream and accepted HDR can be, if the technique is properly applied.
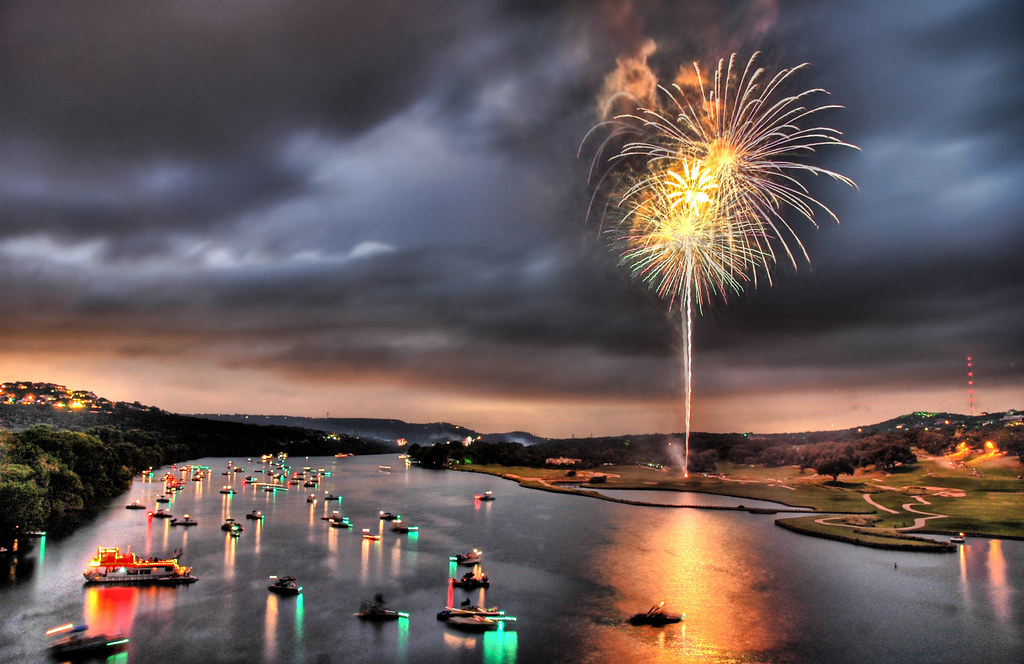

I'm a huge defender and believer of utilizing HDR as a technique for processing photos because I think it helps to evoke my actual memory of the scene.It's just another tool that digital photographers can utilize depending on the situation.As opposed to the camera shutter and aperture, the human eye actually scans the scene at a very high rate of speed, constantly adjusting the pupil diameter to adjust the light and color levels.The brain builds a quilt-like image that is comprised of millions of little bits, combined with neuron-connected memories of colors of objects.For example, when you look at a sunset, you can see all the colors of the clouds and sky, but you can also see all the colors of the trees and rocks in the foreground.
This is why, many times, people get home after a vacation and sigh at their pictures and tell their friends, "Well, it was much better when you were there."With this technique and a bit of practice, no one will ever have to say such a sad thing again.
Step 1: Get your tools on
What apps do you need?I have the three core essentials here: Photoshop, Photomatix, and Lightroom. All of these are available for the PC and the Mac.Note, of course, that Lightroom can be swapped out with Aperture or Bridge if you wish...
One new program to you might be Photomatix, which is quite inexpensive with my coupon code of "StuckInCustoms".You can purchase it for download here.I've been using it for years, and I sent so many people to their site that they gave me a discount code to increase sales!There are many programs I have tried for this technique, and Photomatix is still the best.
Step 2: Get some equipment on the sly so your spouse does not ask too many questions
I have a full "My Equipment" page here, which is much more organized than the following Hawthornesque ramble.
What kind of equipment do you need?All you really need is a camera that has autobracketing.Autobracketing is the ability for your camera to take at least 3 pictures right after one another, each at different shutter speeds.If you are hunting around the menus on your camera now, just look for the words Autobracketing and perhaps some numbers like -2, 0, +2.If you have a DSLR camera, then you probably have this ability.I notice that some of the high-end consumer compact cameras have these as well.
Recommended Low End Camera:
Note:I don't recommend this entry level camera because it does not do autobracketing.It DOES take shots in RAW format, and you can use that for making HDRs (later in the tutorial), but I believe it is better to have a camera that does have autobracketing built in.
Recommended Mid Range Camera:
This is a great camera.It will treat you well and it will last you a lifetime of great shots.
Recommended High End Camera:
This camera is the ultimate.I can say no more.
As for me, I have a Nikon D2X, but I am expecting to get the Nikon D3X any day now.Then, my life will be complete, truly.Well, except for a few minor things that would help take the edge off...
Step 3 - Look at the world in HDR
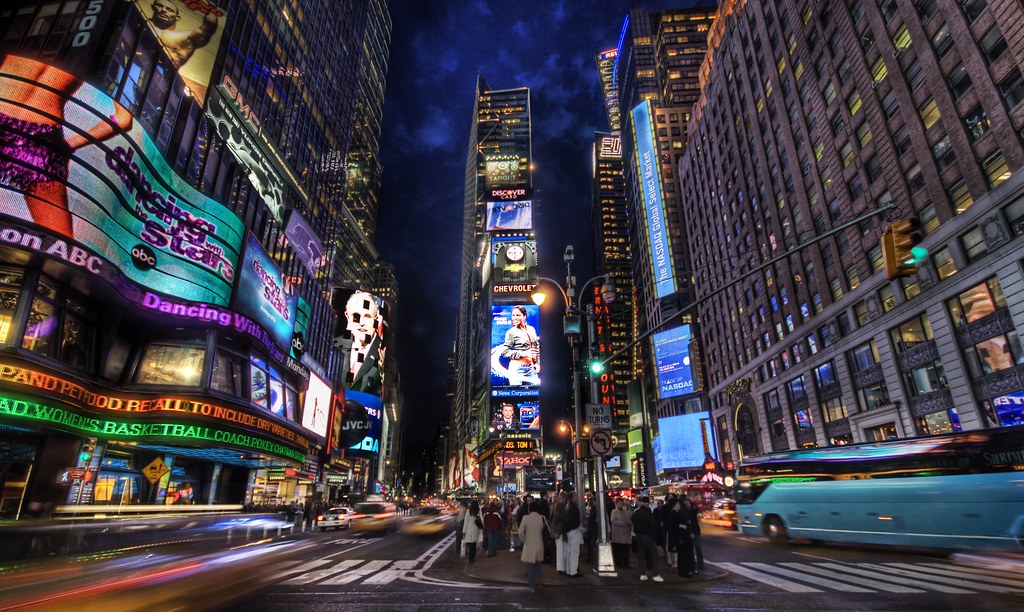
It is key to choose good HDR candidates.What I look for are extreme levels in light in a given scene.Below is a selection of five photos that I shot in New York at Times Square.This is one of the pictures that Getty is currently representing, so I think it is a good example of how to take something mundane and turn it into something beautiful that can be mass market and selected by major agencies.
And here is another photographic-philosophical moment.Everyone shoots Times Square in New York.Everyone.Professionals, tourists, teenagers with grainy cell phone cameras, etc. Think about it and name your worldwide location:Paris, New York, Shanghai - these places are filled with thousands of photographers, many of them very very good, with incredible equipment and great training.YET, it is still quite difficult to get an "original" shot.You end up with just about the same shot that everyone or anyone else can get.So this New York picture is a good example.If you look at this one below, you will see it is a "decent" and "serviceable" shot.However, look at the final version right below that, and you can see how much more interesting and engaging it is.
The BEFORE shot, selected in Lightroom.

The AFTER shot, after running it through Photomatix and Photoshop:
Step 4 - Take your autobracketed pictures and prepare for the HDR
Set up your camera in Aperture Priority mode.Turn on Autobracketing.If you have 3 pics in the autobracket, set it up at -2, 0, +2.On my Nikon D2x, I usually take 5 pics at -2, -1, 0, 1, +2.I usually do 5 pictures in extreme light or extreme dark.The rest of the time, three pictures seems to be okay.
Below, you can see that I have selected 5 pictures from Times Square.You can also easily see that they are all taken at different shutter speeds.By the way, you can click on any picture to go its Flickr page, where you can then click on ALL SIZES then ORIGINAL at the top if you want to zoom in all the way.

Step 5 - Photomatix
Now it is time to fire up Photomatix and get crunk in the HDR house.Okay that was stupid.
Photomatix will take your 3+ shots and convert them into an HDR image.You can then tonemap the image and save it as a JPEG.I'll take you through this process.
The easiest way to use Photomatix (more in the longer tutorial) is to just go to the menu and click GENERATE.

Choose the images you like then click OK.You will then see a second dialog.I have selected the most common choices that I make.That "Ghosting" area never seems to work so well for me, so I don't check it.I have a better method for ghosting that I will show you later.

Click OK again and now your computer will churn like a farm of computers generating a single frame from a Pixar movie.
You will soon see a strange looking image on the screen.You are not done yet - not even close. That is an HDR image and you can't really do anything with it until it is tonemapped.So, go up to HDR in the menu and select Tone Mapping.Now you will get a nice little dialog with all these fun gizmos and Willy Wonka-like controls.
Every picture is different.There is no "right way" to set these sliders.There is certainly a "wrong" way to do it, though.I am sure you have seen lots of crappy HDR images.Below, I paste an example of how you can really make your image look too funkadelic.Funkadelic is cool if that is what you want or you have a lot of druggie friends that like laser light shows and your mind-bending HDRs, but most people don't like them.Actually, please don't look at my old work.It's a little over-the-top too... I cringe when I think about it.Just look at the newer stuff.Thank you kindly.

Above, you can see the options I selected.It's way overdone.Below, you can see better selections.Here are a few things I do... although none of these are cast in stone.I like to crank up the White Point and Black Point bars to give it some punch and contrast.I also like to slide the Luminosity bar over to the right as far as I can before it looks too flat.The further right the Lum bar is, the less halo effect you get as well.If you don't know what the "Halo" effect is, you will soon enough - especially with daytime shots.Another way to combat that is with the next few steps I go through below.

Once you have set everything up with the sliders, click PROCESS.Save the resulting image as a .jpg and then prepare to bring it into Photoshop.
Step 6 - Photoshop fun
As you might have seen, Photomatix is great, but it probably messed up parts of the image that you now need to repair.
This, briefly, is what we are gonna do.
a)import 3 images to make 3 layers - the .jpg HDR you just made, the original RAW, and the darkest RAW.
b) repair the blown-out areas with the correct areas from the dark layer and
c) repair the ghosty cars and people with the real cars and real people from the first RAW file.
Below, you can see I am importing one of the original 5 pictures.

Okay, in this next screenshot, if you look over on the layers, you will see there are 3 of them.TOP LAYER - the cool HDR we just made in Photomatix.MIDDLE LAYER - the DARKEST of the 5 original images.BOTTOM LAYER - the MIDDLE exposure of the original 5. The current layer showing is the 2nd layer.You can see why I chose this one - all of the lighted ads are very sharp and readable, whereas in all the other shots, including the HDR version, they are all jumbled and unreadable.
As you can also see, I have the AUTO ALIGN layers dialog up.I am using that to make sure all 3 layers line up correctly.This is a CS3 option.If you have CS2, you will have to do it yourself.
Also, I am going to throw something at you here called MASKING.This is a really valuable thing to know when cleaning up HDRs.Essentially, what you are doing is taking the TOP LAYER - the HDR layer, and then "punching through" to see the layers beneath.If you look closely at the layers on the right in the screenshot below, you can see that I have created a LAYER MASK for the TOP LAYER.If you see those little black and grey marks there, that is where I have painted black to see the MIDDLE LAYER beneath.I used a paint brush, adjusted the opacity to about 30%, and kept painting until enough of the middle layer shined through.

Now, I combine those two layers into a single layer.We now have two layers.TOP LAYER - the HDR with the fixed ads and blown out areas.BOTTOM LAYER - the original RAW photo with the nice streaking yellow taxis and busses.We need to fix the HDR image on top because, if you look closely, there is lots of ripping and ghosting that looks unnatural.We create another LAYER MASK, then use the 30% brush to paint through to the bottom layer.As you can see from the extreme black in many areas, I painted over many many times until I was effectively at 100% brush, but you don't want to start with that because sometimes the transition between the HDR and the original RAW can be too extreme.

Now, there is just some general cleanup left.I used the blur tool on the sky since there was some noise there, cropped the entire image better, and then pulled up the "LEVELS" dialog to adjust the overall brightness and contrast.I think HDRs look best when there are dark blacks somewhere in the image.Sometimes HDRs don't have a single black dot anywhere in them, and they can look a little fake.I like to take the viewer's eye on a little visual tour-de-force!
Below, we can see the final image once again!All the hard work has paid off!Behold!
There are a few other techniques on the longer version of this tutorial for different conditions.One common question is how to do this with just one RAW photo.That is easy and can be done with Photomatix as well.
Over the next month, I will be updating the tutorial for 2009, and I will continue to update it and evolve it with newer, better techniques as I figure them out every few months or so.I hope this has been useful to you!I will close with a few of the most recent shots I have processed in the last month or so...and remember, you can do this stuff too!It just takes a lot of practice and failure.Remember what Winston Churchill said:"Success is the ability to go from one failure to another with no loss of enthusiasm."
")
")
")
")
")