Super Easy Neon Style in PhotoshopListThumbs

Super Easy Neon Style in Photoshop
This past Friday was the Abduzeedo meetup here in my hometown of Porto Alegre. It was really cool, we had a lot of fun and a lot of beers! When I was leaving I noticed the neon sign outside the pub and it really inspired me to create a tutorial on how to acheive that type of effect in Photoshop.
In this tutorial I will show you how to create a nice light effect in Photoshop. We will use Layer Styles and Blend Modes to simulate a neon text effect.
Step 1
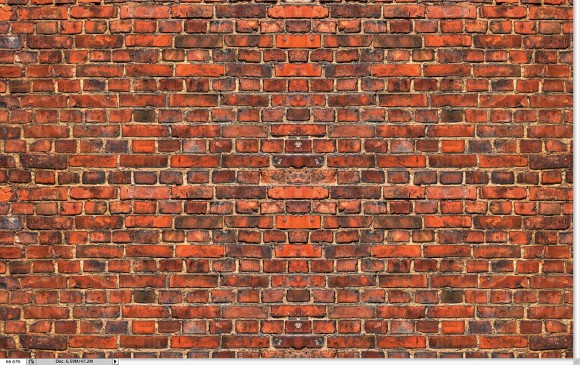
Open Photoshop and create a new document. I used 1920x1200 pixels. After that import a brick texture, the one I used was a courtesy of Shutterstock and you can download it here
Step 2
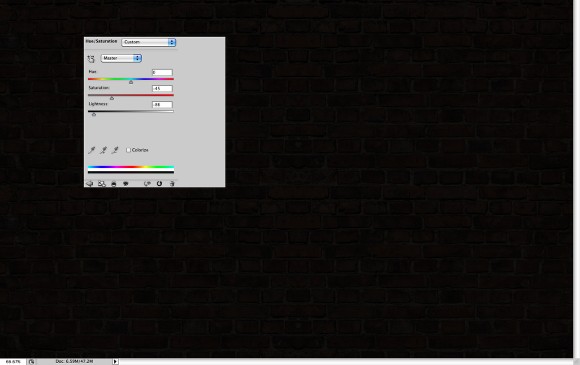
With the texture layer selected go to Image>Adjustments>Hue and Saturation. Use 0 for the Hue, 45 for the Saturation and -85 for the Lightness.
Step 3
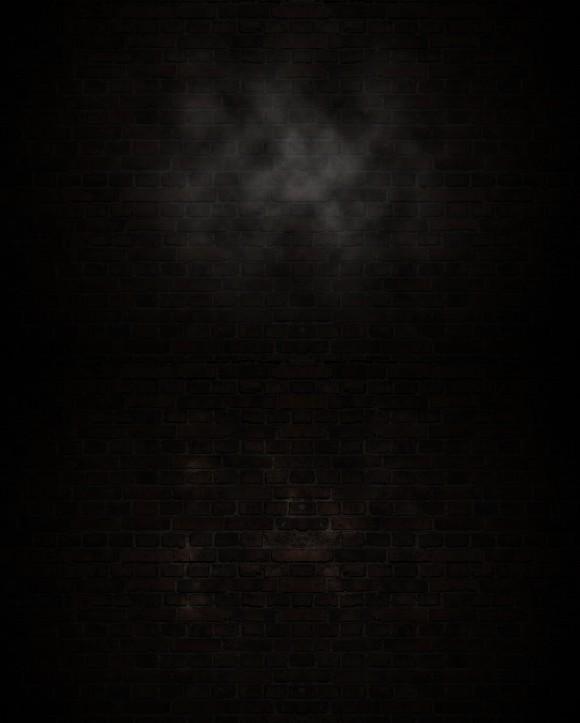
Add a new layer and go to Filter>Render>Clouds. Make sure you had black and white for the foreground and background colors. With the Eraser Tool (E) delete the areas close to the edge and leave just the center of the image. After that change the Blend Mode to Color Dodge.
Step 4
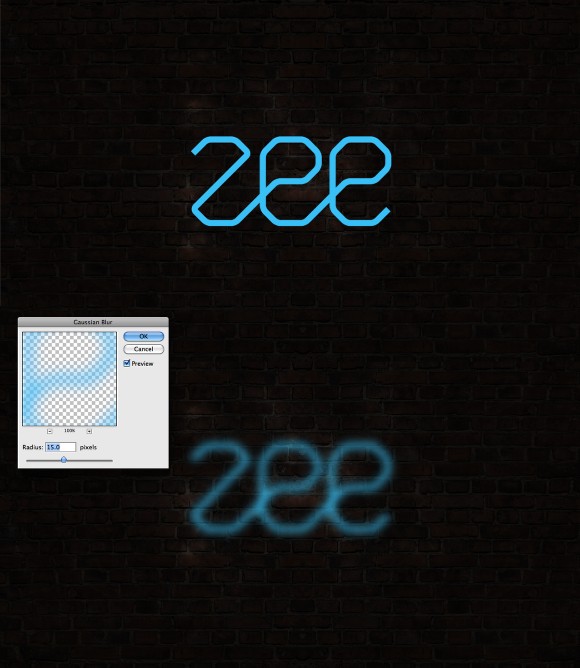
Import the logo you want to use for the neon effect. I'm using the ZEE logo I created a few weeks ago. Duplicate the layer and hide it because we will need to use a few copies later on in this tutorial. Select the visible logo layer and go to Filter>Blur>Gaussian Blur. Use 15 pixels for the Radius.
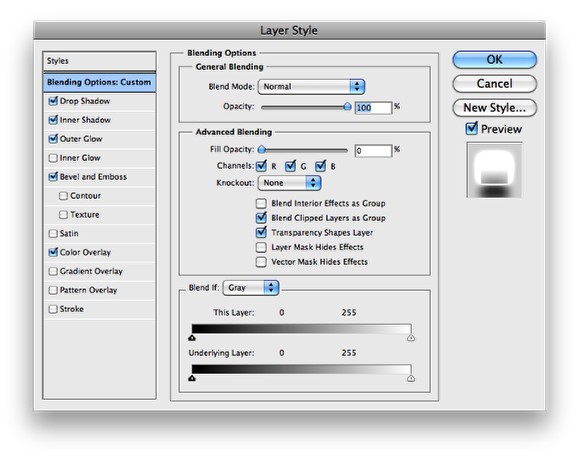
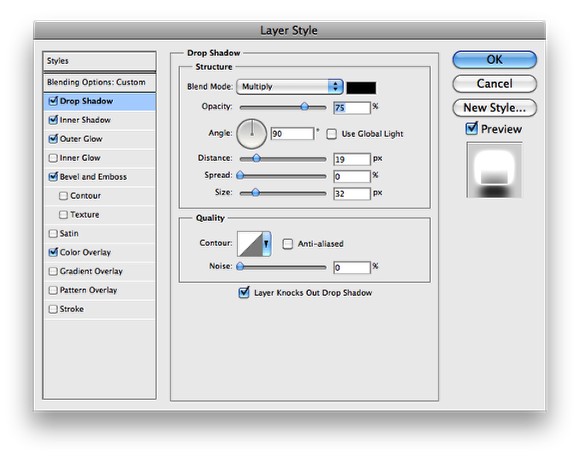
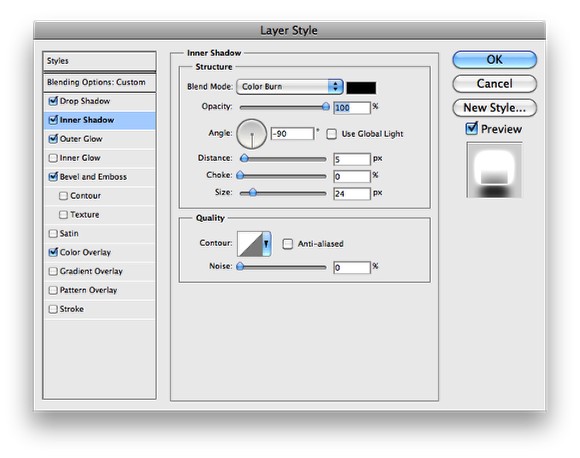
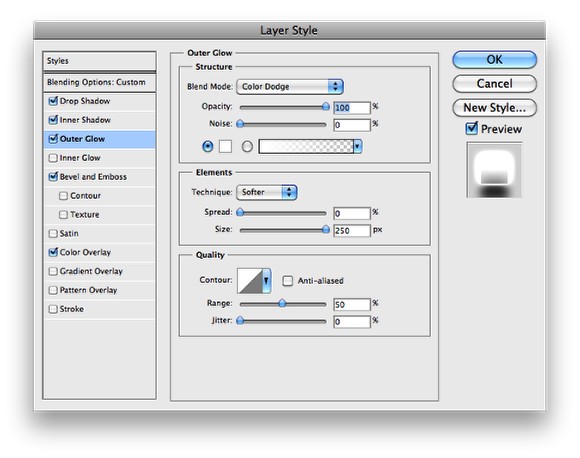
Step 5
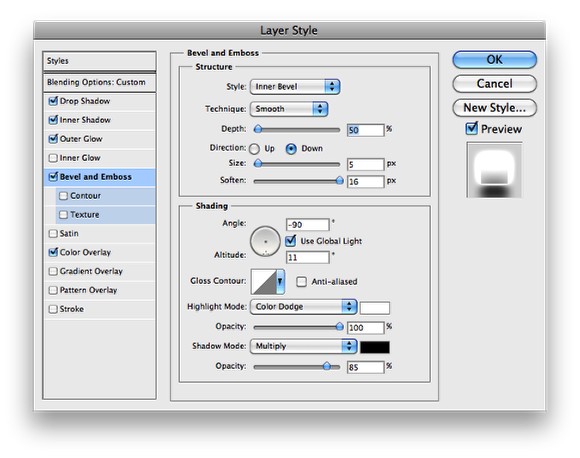
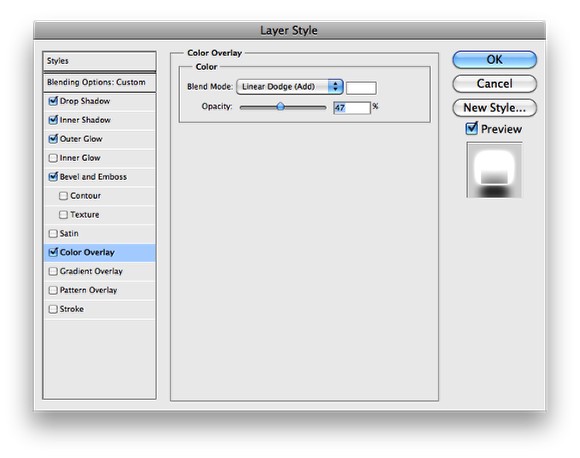
Follow the images below for the settings of the Layer Style. We will be using Drop Shadow, Inner Shadow, Outer Glow, Bevel and Emboss and Color Overlay.


Step 6
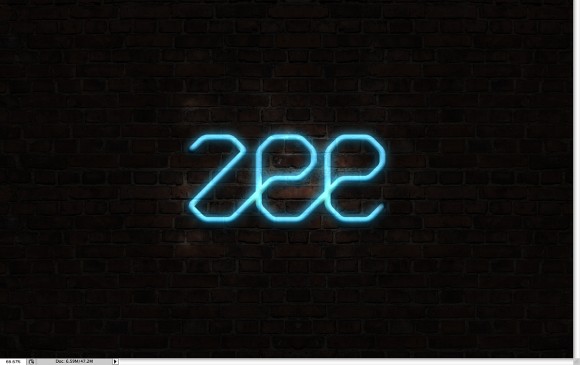
This will be the result you will get after the layer style.
Step 7
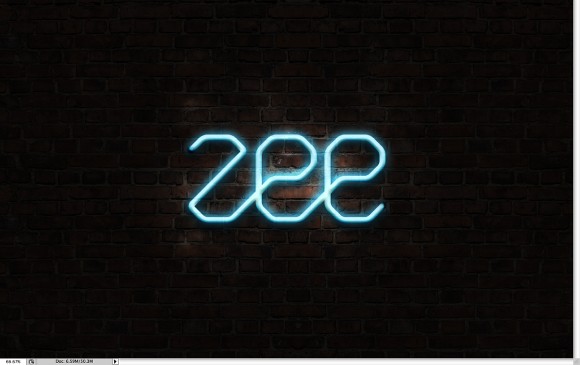
Duplicate the layer with the layer styles to make the effect a bit stronger, but reduce the opacity to 50%.
Step 8
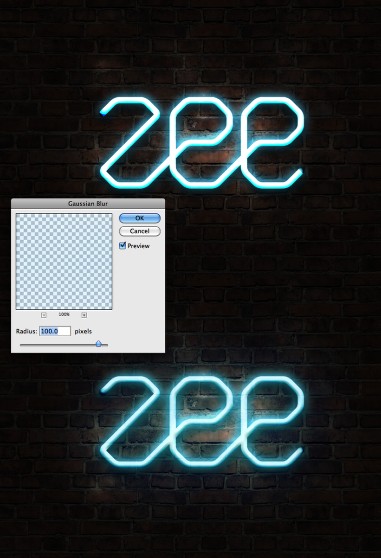
We will need another layer with the logo without any layer style applied to it. Put this new logo on top of the others and then go to Filter>Blur>Gaussian Blur. Use 100 pixels for the Radius. Also change the Blend Mode to Color Dodge.
Step 9
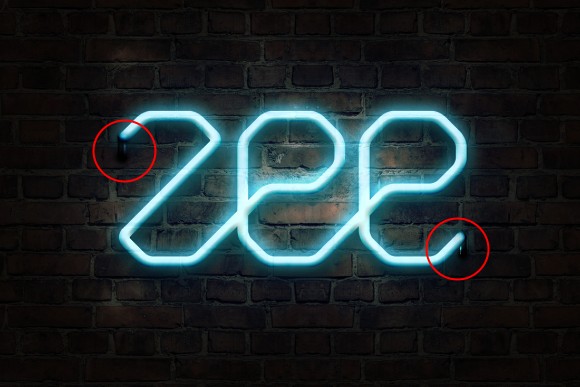
Now with the Brush Tool let's create the base part of the neon that will be fixed on the wall. Use black for the color and put this behind the neon layers. After that go to Layer>Layer Style>Bevel and Emboss. Use the image below for the values of the Bevel and Emboss. For the "E" base use -160º for the angle and for the "Z" base use 0º.
Step 10
Again with the Brush Tool (B) and a very soft brush, using 0 for the hardness, add a new layer behind the layers created in the previous step. So just paint a very soft shadow.
Conclusion
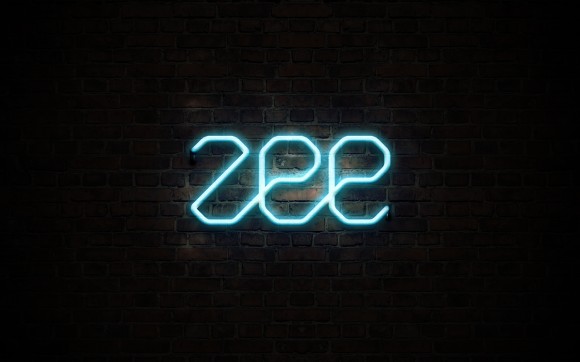
Light effects are always really cool for wallpapers, I'm really addicted to these types of effects and in this tutorial I showed you how to create a neon effect. Basically, the effect is all about layer styles and blend modes. Now, it's up to you. You can try different colors and backgrounds but the technique won't change that much from this one.

Click on the image for full preview
Download the Photoshop file
Click here to download the Photoshop file used for this tutorial


72 Comments
thanx great tuts !
_____________________
http://hybrid-creation.deviantart.com/
Very Cool.
Awesome Effect
Thanks
Wow amazing and just simple, luv it :) obrigado!
Simple tutorial, but AMAZING effect!! Thanks for sharing Fabio.
Neat tut!
_____________________
http://andreimogan.deviantart.com/
Dude, GREAT tutorial... thanx!
???????. thanks)
easy to follow and amazing. thanks
Awesomee ! I was REALLY hoping for this interview when i saw the picture . Nicee : )
http://chermayneshenli.deviantart.com/
Whoops ! Tutorial i meant ; )
looks great, gonna test this soon
hey guys!
first of all, nice tut, thank you.
second, what kind of letters did you use ?
Great little tutorial, loved the final effect, works really well!
Simple and beautiful, thanks!
Nice indeed, but ads for Scientology actually really sucks!
Muito legal!
Gostei do acabamento e detalhe!
Parabéns
Awesome :) it's all about the little details!
Its really a good, realistic and very easy tutorial, just another great work by fabio the abduzeedo.
I can't believe I'm failing but I gotta be doing something wrong. :/
Is the layer style applied to the blurred out layer or the normal one? Tried both, failed :(
this is amazing! thanks!
tutorial is nice, but why the f*** is there an ad for scientology? you'll definetely loose my respect if you won't delete that >(
Simple and straight to the point. Thanks for yet another great tutorial, Fabio!
Great tut
------
http://dany2k9.deviantart.com/
awesome, worked out just fine
fantastic tut. easy and effective.
That looks sick, nice job. If anybody want to pay for it—the Filter Forge plug-in for photoshop has a filter that you can install that is REALLY good for this too.
Love this tutorial but I have one nit to pick... where the joints cross on real neon, you will see a bit of discoloration, a darkening of the tube... will try the tut and add that to my own and post to see... thanks for the great work!
is the 'zee' logo you used a .jpeg?
not had similar results on my try with both the smoke and logo effect :(
layer effects smudged it out too much, though i didnt use a 'clean' font.
will keep trying!
thanks to download
great result!
Judging by your PSD file, you left out a ton of important steps.
Namely, what color should the logo be when you make the Fill Opacity 0% ? The thumbnail shows black for that layer, but when I go to edit the original Vector Object for the "Zee" logo, there's a color overlay to the logo.
Yet another "easy" Abduzeedo tutorial that is missing a lot of steps, as the PSD available for download does NOT reflect the given steps.
hey nice tut!!
i have a question....what kind of font did u use? it was made by you?
I love this tutorial! Thanks for sharing! What are some great fonts to use along with the Neon tutorial.
Beautiful!=)
GREAT!!!
Great Neon Style. Thank you.
I really love the simple tutorials. There's some great techniques to be picked up within this one.
Thank you
great tuts and nicely effect ! thx
very helpful, thanks
Nice this great!:D
Não rolou aqui... o layer styles nao consigo chegar no mesmo resultado :(.. fiz tudo exatamente igual...
It's all in the details. Most neon tutorials leave out the part about fixing it to the wall. Those little things give you a much more realistic image.
Great!
GREAT .....
Thank you .........
It is GREAT
Thank you
Great
Thank you
nice tutorial
wonderful thanks for that
barkod
Fabuloso.... Gracias ! ! !
Genius....
Exactly what I was looking for! Thanks Fabio! =D
Nice and easy tutorial really helped me to learn Neon Style fonts in Photoshop. Thanks for sharing this attractive tutorial.
Nice, Very Nice
thanks for this easy tutorial
Wonderful, I made it in my friends name, Check it out!
http://saiihtam.deviantart.com/art/Stacey-white-139303718
really nice tutorial
http://www.alias3dmedia.com
WWW.alias3dmedia.com
Nice i will try this right now :D
great tut fabio..i'll try this right away.
Very nice, Thanks!
Excellent logo !!!!!!!!!!!!!
Especially with the neon glow !!!!!
I love your style of design, it's very inspiring to a graphic designer like myself. I have question to ask you ? When you are work on a project you suddenly get a brain freeze.
What do you do to solve that problem ?
Hey Fabio, I really like your tutorials and the best part is that the tuts are all free. I really liked this Neon tut and have recommended ur site to all my frnds. They liked it too.
Keep doing the good job man....it'd be nice if i get to hear frm u..
P.S.- I am only 13.
This is great. Very nice work, keep the good tutorials coming!
-Andy from Megastarmedia.com
great pic and everything, but it leaves out a few important steps.
Tnks i lov this tut!! its a great stuff!
Bro, sou seu fã vc faz umas coisas muuito foda!
ME GUSTARIA TENER ESTE PHOTOSHOP COMO AGO PARA VAJARLO . MUCHAS GACIAS
It is the coolest site, keep so!, No Prescrition Soma Diet Pills, [url="http://albumenise.angelfire.com/no-prescrition-soma-diet-pills.html"]No Prescrition Soma Diet Pills[/url], http://albumenise.angelfire.com/no-prescrition-soma-diet-pills.html No Prescrition Soma Diet Pills,
Your tutorials is very clear and helpful. Thanks
Great i will try this right now :D
Can I ask what version of photoshop is that ?
Way to leave out steps.
Hello ..
I must say its a very nice tutorial.
Can you post a tut web site designing in photshop and dreamweaver
Really nice effect!
Post new comment