Colorful Light Effect in PhotoshopListThumbs

Colorful Light Effect in Photoshop

October 26, 2009

Last week I was waiting hours in airports, as usual, I was wandering and checking out banners and signs when I found a beautiful Sony ad of a cel phone called Xperia. The thing that really caught my attention was the wallpaper of the phone. It was a colorful light bean crossing the screen . I really like the effect and thought to myself, that is a good idea for a tutorial.

So in this tutorial I will show you how to create a super easy but at the same time beautiful light effect.

Step 1

Open Photoshop and create a new document, for the size I used 1920x1200 pixels. After that fill the background layer with a very dark grey (121212).

Colorful Light Effect in Photoshop

Step 2

With the Rectangle Tool (U) create a rectangle in the middle and crossing the canvas, use white for the color.

Colorful Light Effect in Photoshop

Step 3

If you are using Photoshop CS4, convert the rectangle to Smart Objects so you can apply Smart Fllters. Then go to Filter>Blur>Gaussian Blur. Use 10 pixels for the Radius.

Colorful Light Effect in Photoshop

Step 4

Add another layer and then with the Brush Tool (B), use a very soft brush, with 0 hardness. Select white for the color and then start painting some spots. Use the keyboard shortcuts [ and ] to reduce the opacity of the brush, that way you will be abel to create more variations.

After that select the rectangel layer and this layer you have just painted and then go to Layer>Group Layers. The layers will be in an folder on the Layer Panel. Change the folder's Blend Mode to Color Dodge then.

Colorful Light Effect in Photoshop

Step 5

Add a new layer on top of the backround layer but beneath the other layers including the group with the light effects. Then fill the layer with any color and go to Layer>Layer Style>Gradient Overlay. Use Multiply for the Blend Mode, 90% for the Opacity , 180º for the Style and for the Colors use purple, red, yellow, and green. Also over the Blending Options, change the Fill Opacity to 0, that way the layer will have just the Gradient Overlay.

After this step you will be able to see a very nice and colorful background already.

Colorful Light Effect in Photoshop

Step 6

Add a new layer, on top of the gradient layer but beneath the others. Then go to Filter>Render>Clouds. Make sure you had black and white for the background and foreground colors. After the clouds filter, go to Filter>Blur>Gaussian Blur. Use 20 pixels for the Radius. Change the Blend Mode to Soft Light, then with the Eraser Tool (E) using again a very soft brush, delete parts of the layer. The idea is to make the gradient less uniform, like a smoke.

Colorful Light Effect in Photoshop

Step 7

Create a new document using 100 pixels for the width and 10 pixels for the height. Resize the background layer so it's half of the height, 5 pixels. Select all and go to Edit>Define Pattern. Name the new pattern the way you want it, and you will have a very cool stripe pattern.

Back to our design, add a layer on top of the background layer but beneath the others. Then with the Paint Bucket Tool (G), change the type from foreground to pattern. Select the stripped pattern you have just created and fill the layer with it. After that change the Opacity to 2% and go to Filter>Blur>Gaussian Blur. Use 2 pixels for the Radius.
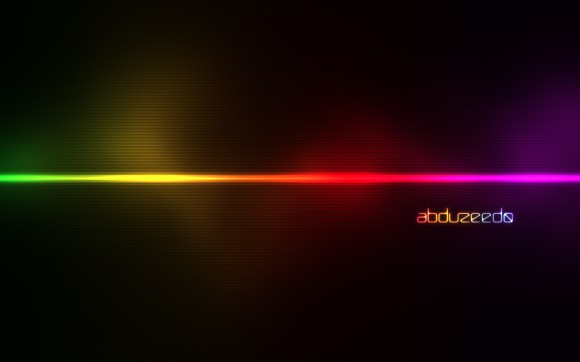
Colorful Light Effect in Photoshop

Conclusion

Press Command(mac)/Control (pc) + Alt + Shitf + E, and you will have a new layer with all the layer merged. Then go to Filter>Noise>Add Noise. Use 1.4% for the Amount and Gaussian for the type. Now it's all about adding your brand and you have an awesome wallpaper. Once again we have just played with Blend Modes and basic filters. Most of the light effects use the same process, so it's all about trying and playing with the tool.

Colorful Light Effect in Photoshop
Click here for full preview

Download the Photoshop File

Click here to download the Photoshop file

About the author

User picture

My name is Fabio Sasso, I'm a graphic/web designer from Porto Alegre, Brazil and I'm the founder of Abduzeedo. I hope we can share lots of information, tips, and ideas through Abduzeedo. Also you can follow me on Twitter or my personal site at http://fabiosasso.com.

Sponsored Links:

More content from:

Help us to share this!

55 Comments

Hybrid5910/26/2009

Facile , rapide et jolie en plus merci !
________________________________
http://hybrid-creation.deviantart.com/

Tarzan SERBIA10/26/2009

Simple, clean and fantastic!

cooli.e_c10/26/2009

It really is amazing how just a few commands in photoshop can create such a cool image. Gotta love those quick photoshop tutorials

vanice10/26/2009

where is the download file?

Modusoperandi11/04/2009

Vanice, here is the download file:

http://abductit.com/files/tutorials/Colorful_Light_Effect_in_Photoshop/S...

Aiala10/26/2009

Cool Effect

Ricardo Frances10/26/2009

Hmmm... So I guess you didn't happen to look mine while doing yours, right? http://liquid-snake.deviantart.com/art/HOWTO-Xperia-ish-Wallpaper-107518508

abduzeedo10/26/2009

That's awesome, I didn't know that... we were inspired by the same thing, the xperia.... We could publish the GIMP version on Abduzeedo what do you think? I did a pixelmator version as well.

Moe10/26/2009

show me the Pixelmator-Version pls!

Ricardo Frances10/26/2009

The gimp version is finished, tell me how to send it to you.

ejm39910/26/2009

Cool look, great tutorial!

http://emeyers399.deviantart.com/

Sergio Goncalves10/26/2009

Excellent Work!
But now i have a question, how can i make a movie with this image?
P.S: If you answer in portugues is better for me... x'D

smq10/26/2009

nice outcome, gonna use this

Markus J Nielsen10/26/2009

Cool! thanks :D

Remko10/26/2009

If you posted this 2 years ago I would be impressed, but tbh you can do much better than this :) Not flaming, just saying I rather see more high-end, mindblowing tutorials on here :)
Besides that, still loving the site, keep it up!

John Herskind10/26/2009

@Ricardo Frances, the only difference between your xperia design and fabio's is that fabio's looks 10 times better...

thewebtuts10/26/2009

Tutorial added to thewebtuts.com

Jad Graphics10/26/2009

Very nice tutorial. Simple but great effect!

Anonymous10/26/2009

Could not find a layer style function in CS4, any suggestions?

Anonymous10/27/2009

Hi Thanks for the tutorial,

Can you please explain the step 7 I'm stuck in here can't understand what you mean in there.

Thank you

regards

webxfun10/27/2009

Thank you, Fabio,I like Effect .

Anonymous10/27/2009

Not worth the read.

smq10/27/2009

after realizing i had to create this in 16bit, im a little stuck here. how do i convert it to 8bit without lookin poor?

chrixix10/27/2009

its not half as cool without this great abduzeedo-logo ;)

Lost_Artz10/27/2009

I have to be honest, I don't think a tut was necessary for something as simple as this. It's kinda a waste.

linhnguyen10/28/2009

nice tut, thank Fabio !

thepeachdesign10/28/2009

Like it but i got to agree with @chrixix, without the logo, it would look very dull. ;-p

__________________________

www.thepeachdesign.com

Anonymous10/28/2009

Hi, this tut should be 'super easy' but I just can't get the same effect. I got stucked at step 4, where I can't get that smooth glowing line. When I set the group to color dodge the whole line is almost not visible anymore. When I duplicate and merge the spotlayer a couple of times, then not only the line but also the spots get too bright. Also the gradientcolors are too hard, but if I reduce the opacity then the saturation is likewise not enough. Can anyone help out?

Varcolacu10/28/2009

Hi!
Look, sorry if i made the wrong decision, but i made a Video Tutorial out of this, with the proper credit, and a few modifications.
I hope this isn't wrong.

All credits go to you :)

http://www.youtube.com/watch?v=zMU1FYU5Aug

I have a mania about Video Tutorials, and i felt like this was a great tutorial to "videolise" ^^
Excelent tutorial by the way :)
I hope that i can help a few persons who can't really understand, or that want it just a little bit diffrent.

PS. I just uploaded the video, so it might take YT some time to process it.
It's pretty HD, so i don't think it will be a problem.

And also, if you don't agree with my tutorial, just let me know, and i'll remove it imediatly.

Have a nice day :)

Ciucku10/29/2009

nice and easy thanks =)

Bruno Blanco10/30/2009

Cara me sinto retardado quando não consigo acompanhar um tutorial desses, mas eu estou perdendo alguma coisa no passo 5, quando coloco fill opacity em 0 a imagem fica toda preta (aparece só o fundo) não consigo descobrir meu erro e ficaria muito feliz se você pudesse me ajudar.

Abraço

soroush10/30/2009

hi.
i have a question!
i cant undrestand step2.im trynig but icant :(
can you tell me more pls???

Varcolacu11/01/2009

Hi soroush, i will try to explain as good as i can.
The tutorial sais that you have to create a rectangle using the rectangle tool. well, basicly you have an alternative. Take out your sellection tool, rectangle sellection tool to be more exact, and then fill it with white (either via the bucket tool, either the edit->fill) ... anyhow, ... if you still can't understand try to figure out what i did in my video tut. Seeing something rather than understanding how it's done does the trick sometimes.
Oveall, all you have to do is create a white rectangle, no matter what is the method you used.

I hope i helped.

Cboarder10/31/2009

Is it possible to do this same effect with say a logo or text and if so what steps do you change/add?

Cboarder10/31/2009

never mind...i got it...lol

OktayOe.10/31/2009

Looks great but I never get the same like you.
More detail to the gradient colours would be great :)

aliaskajan10/31/2009

nice tutorials :)

soroush11/03/2009

oh sorry!!! so sorry!!! i made a mistake about step number!!!!:p
EXCUSE ME!!! i mean step 5 not step2!!!
i'm ashamed of you:p
i do every thing easily but when i create a layer on top of BG layer and try to make a gradient like you,then this gradient is not fill the rectangle,it fills all of the layer.
i mixed up in these small step.
should to say i love this picture that u make a toturial about this.
again sorry for my mistake.
tnx a lot.

Varcolacu11/04/2009

Nothing to it, anyone ca make a mistake, right? :)
Anyway, make sure you have sellected Multiply as the Blending Mode of the Gradient. Other than that, it should work fine.
I'm sorry if this didn't help, but it's your best shot :)
Have fun.

maluchinha11/03/2009

Nice tut! Simple and easy to learn the program, like I do.
Thanks a lot.

I like to add a name like "abduzeedo" with the same glow effect, anyone knows some?

Varcolacu11/04/2009

There is a tutorial on how to make a text effect like the "abduzeedo" logo right here, on this site.
A little digging, and i got you a link : http://abduzeedo.com/shining-neon-text-effect-photoshop
Have fun :)

Varcolacu11/04/2009

Hi again, i heard that some of you are intrested in a Pixelmator Version. I managed to pull one off ... it ain't the best, but i hope you'll enjoy it :)
http://varcoblog.co.cc/design/tutorials-design/colorful-lights-pixelmator/
By the way, i hope, Abduzeedo, that you take it badly the fact that i'm posting a tutorial outside your site here :)

sv7811/06/2009

cheers, i have just made a whole array of these for my se satio

Leo11/06/2009

This is a GREAT effect, and I'm sure that it is a great tutorial also but I'm stuck at step 4, when I put the two layers in a group and change the blending mode to "color dodge" the line and the spots seem to disappear (they become very dark) and I've tried duplicating the group and then merge the two, but then the lines and the spots become too bright.

I would appreciate it a lot if you could help me.

Thanks for this amazing effects, as always =D

adobe basics11/07/2009

very good effect very detail and easy this site is great.

CarlottaCorday11/08/2009

tHANK Abduzeedo for your tutorials!!!!! From Venezuela!!
I have learm very

Anonymous11/09/2009

can you post a tutorial showing how to make this on GIMP?

metalhaze11/10/2009

Can someone explain to me why layers act differently inside of a grouped folder as opposed to being loose as just a layer.

For instance, if you follow the directions in this tutorial but don't put the the layers in a group as stated in step 4, the blending doesn't work correctly.

Also, come come the color will only show up if you use a shape with a gradient overlay? if you were to just paint on the layer below the layer group with a paint brush, no color appears. You only see color after adding a gradient overlay.

Basically can someone give a quick run down of how PS treats layer and layer groups when it comes to blending things? Maybe this should be a tutorial on this site....And if there is one already for this, anyone have a link??

hit me up on AIM if you want to discuss this with me, thanks!

"tekken shihan" - AIM handle

aledesign.it11/10/2009

Fantastic..abduzeedo..is the best!

RoboCossack11/11/2009

Maybe it's only my videocard problem, but my whole image is in obscure vertical sections, like in Step 5 printscreen. But my "vertical" noise doen't disappear. Please help :)

Kirill11/13/2009

Hmm ... Just a thought on this subject, but here such a gorgeous post, thanks!

angeldies11/13/2009

hi i just tried the tutor, but i got stuck in step 4, when i change the group blend mode to color dodge the group image was disappear.. :D
anyone can help...??
thanks.. : )

MattL11/18/2009

For others that are seeing the white line/ clouds disappear when switching to color dodge. Try making your lines bigger and your clouds less transparent. Hope this helps someone who is stuck here.

Lezl11/20/2009

This is what I got, I made a little variation of this tutorial...

http://www.flickr.com/photos/44829973@N04/4119239123/

Post new comment

The content of this field is kept private and will not be shown publicly.

Icon Ads Wall

  • Openjobs - Oportunidades de Emprego para Profissionais de Talento
  • Zee - Irrezeestível Design Digital
  • Tradd.us - Contextual Translator
  • DesignFlavr, Inspirational Art and Design served daily
  • Signalnoise.com | The art of James White
  • Alberto Seveso - Illustrator
  • Description: Award Winning Portfolio and blog of Web Developer Anthony Woods

Do you want to advertise here?