by abduzeedo
When I created the very first version of Abduzeedo I did a simple logo because I didn't have much time back in 2006, I wanted the blog up and running as faster as possible. However after a few months I decided that it would be cool to have a nice and unique logo, but without using any symbol. That's why I chose to create a font instead of using an existing one and with Adobe Illustrator new anchor point features this task is much easier.
Now that we celebrate the 2nd anniversary of Abduzeedo, and the new year that's about to begin we want to share with you how the new Abduzeedo logo will look like.
In this tutorial I will show you how to create a nice typeface using Illustrator CS4 and its new, and very useful, features for editing anchor points.
Step 1
Open Illustrator and create a new document. Select the Rectangle Tool (M) and create a square. To do that just hold SHIFT while using the Rectangle Tool.

Step 2
Select the square you have just created and go to Effect>Stylize>Round Corners. Use 8pt for the Radius, but if you want to make your typeface more rounded just use a higher value.

Step 3
Duplicate the rounded square. You can do that by moving the object holding ALT. Also hold SHIFT to keep the same vertical alignment. Make sure you have the Smart Guides enable too, this way you can see the X and Y values and the alignment guides as well.

Step 4
Now select the the 2 objects and go to Object>Expand Appearance. That will transform the object allowing you to edit the points with the Direct Selection Tool (A).
Step 5
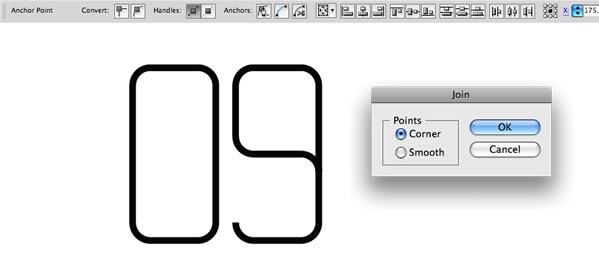
Now the best part will begin, editing the points and create the characters. Let's start with the numbers to create the 2009. As you have already created the number 8, to create the 9 is easy. With the Direct Selection Tool (A) delete one of the round corners (1), in this case the one going up. After that still with the Direct Selection Tool, select the point (2) and move it down to close the object.

Step 6
One of the very useful new features in Illustrator CS4 is the Anchor Point Tool Bar. You can Join points, convert the anchor points to corner or smooth, and one of the great additions, align the points. Then witht the Direct Selection Tool (A) just create the other numbers by deleting or duplicating corners.
Step 7
With the number 0, create a line that crosses the number. Use the Line Segment Tool (\) to do that.

Step 8
To create the number 2, just duplicate the 9 and then go to the Transform box. At the very top left corner click on the icon to open more options. Then choose Flip Horizontal. Again with the Direct Selection Tool (A) just delete the marked segment and you will have the number 2.

Step 9
As the numbers are all lines, you can make them thicker by just increasing the value of the Stroke.

Step 10
To create the other characters, in this case I will do the Abduzeedo word, you will only need to duplicate a number and with the Direct Selection Tool, delete some segments. Here to create the B and D I used the number nine, flipped it vertically and horizontaly, and then delete some rounded corners.

Step 11
The A was a bit tricky but it's the same process, deleting corners. Use the Smart Guides to keep the alignement and also the Anchor Point Tool Bar to join points.

Step 12
For the other characters repeat the previous steps, you can try different shapes for some characters, like the E, you could just flip the A vertically and horizontally to create the E, but I thought it would be better make it a bit different, then I used the Z for reference.

Step 13
If you want to transfor your characters from just lines to shapes, select all characters and go to Object>Expand. Make sure that Fill and Stroke are selected and press OK. That way what was line become shape.

Step 14
With the shapes you can apply gradients to them, and the new gradient tool in the CS4 version of Illustrator has improved a lot. Now you can change opacities of colors, like we could do in Flash.

Step 15
The whole process is really fun, you can try lots of different variations for each character and see which one is the best for you. The only problem is that you might get some doubts when choosing the final version, like happened to me. That's why I'd like to ask you which one of these 3 version you think it's the best for the new Abduzeedo logo.

Conclusion
The new version of Illustrator, the CS4 has improved a lot when editing anchor points, now you can align them, make the smooth or corner much easier. The whole idea behind this tutorial was playing with basic shapes to create a nice typeface, and as I've received lots of emails asking me what's the name of the font I used for the Abduzeedo logo, it was a custom font I did using the same process.
Also, I wish you all a great New Year, and that in 2009 we can improve our design skills even more by sharing our knowledge.

Video Tutorial
New Year New Typeface New Logo from fabio sasso on Vimeo.


