by abduzeedo
This past Friday was the Abduzeedo meetup here in my hometown of Porto Alegre. It was really cool, we had a lot of fun and a lot of beers! When I was leaving I noticed the neon sign outside the pub and it really inspired me to create a tutorial on how to acheive that type of effect in Photoshop.
In this tutorial I will show you how to create a nice light effect in Photoshop. We will use Layer Styles and Blend Modes to simulate a neon text effect.
Step 1
Open Photoshop and create a new document. I used 1920x1200 pixels. After that import a brick texture, the one I used was a courtesy of Shutterstock and you can download it here

Step 2
With the texture layer selected go to Image>Adjustments>Hue and Saturation. Use 0 for the Hue, 45 for the Saturation and -85 for the Lightness.

Step 3
Add a new layer and go to Filter>Render>Clouds. Make sure you had black and white for the foreground and background colors. With the Eraser Tool (E) delete the areas close to the edge and leave just the center of the image. After that change the Blend Mode to Color Dodge.

Step 4
Import the logo you want to use for the neon effect. I'm using the ZEE logo I created a few weeks ago. Duplicate the layer and hide it because we will need to use a few copies later on in this tutorial. Select the visible logo layer and go to Filter>Blur>Gaussian Blur. Use 15 pixels for the Radius.

Step 5
Follow the images below for the settings of the Layer Style. We will be using Drop Shadow, Inner Shadow, Outer Glow, Bevel and Emboss and Color Overlay.

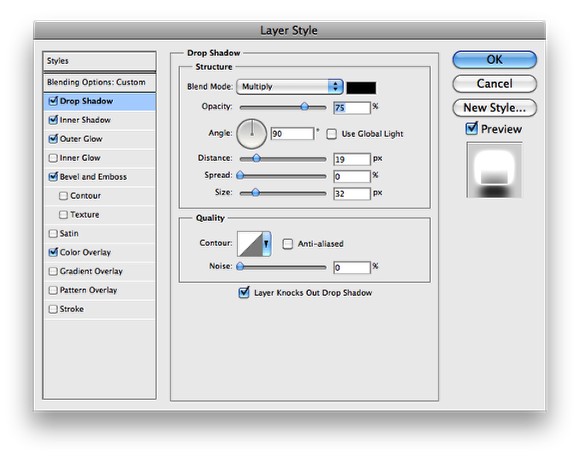
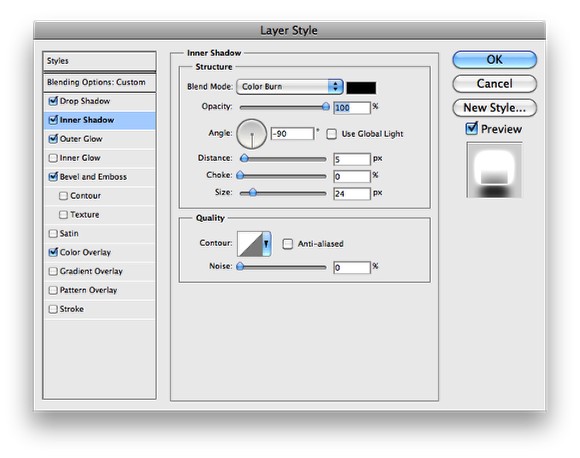
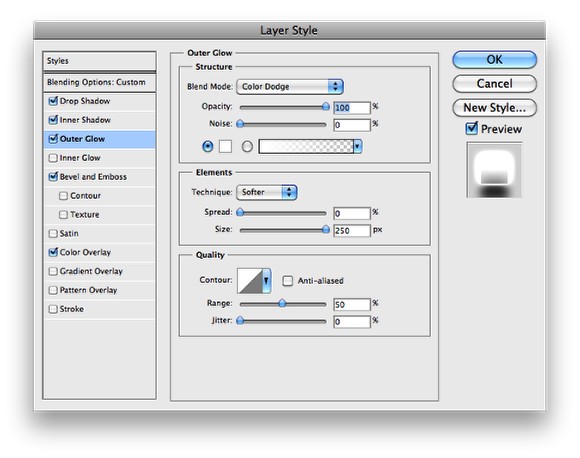
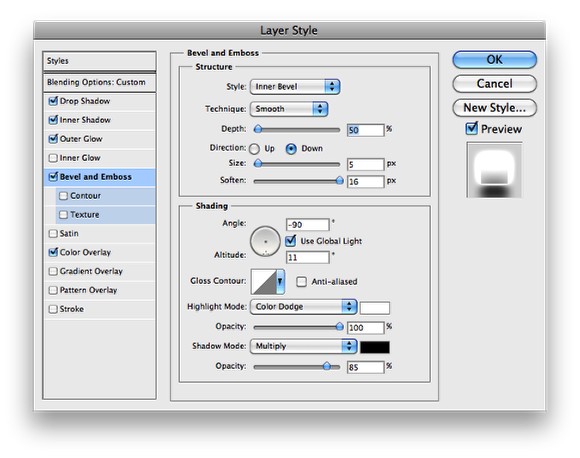
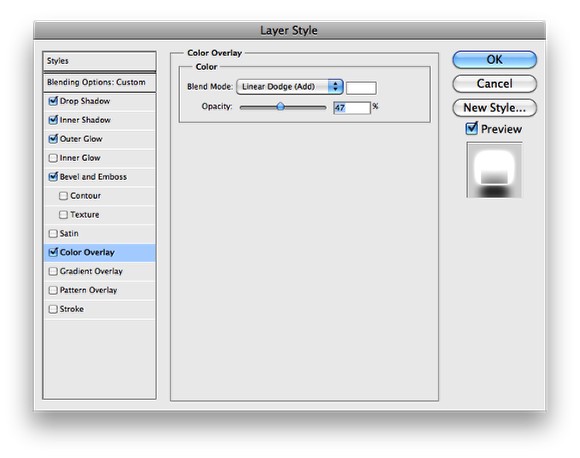
Step 6
This will be the result you will get after the layer style.

Step 7
Duplicate the layer with the layer styles to make the effect a bit stronger, but reduce the opacity to 50%.

Step 8
We will need another layer with the logo without any layer style applied to it. Put this new logo on top of the others and then go to Filter>Blur>Gaussian Blur. Use 100 pixels for the Radius. Also change the Blend Mode to Color Dodge.

Step 9
Now with the Brush Tool let's create the base part of the neon that will be fixed on the wall. Use black for the color and put this behind the neon layers. After that go to Layer>Layer Style>Bevel and Emboss. Use the image below for the values of the Bevel and Emboss. For the "E" base use -160º for the angle and for the "Z" base use 0º.

Step 10
Again with the Brush Tool (B) and a very soft brush, using 0 for the hardness, add a new layer behind the layers created in the previous step. So just paint a very soft shadow.

Conclusion
Light effects are always really cool for wallpapers, I'm really addicted to these types of effects and in this tutorial I showed you how to create a neon effect. Basically, the effect is all about layer styles and blend modes. Now, it's up to you. You can try different colors and backgrounds but the technique won't change that much from this one.

Click on the image for full preview
Download the Photoshop file
Click here to download the Photoshop file used for this tutorial
