by abduzeedo
Last year I created some images using fireballs, explosion, fire and smoke. Basically I only used brushes to create that in Photoshop. Now with the release of the new Pixelmator 1.4 and its brand new Brush Engine I decided to try it and create the same image in Pixelmator.
So, in this tutorial I will show you how to create fire and smoke using Pixelmator. We will play with the Brush Engine, colors and Blendings.
Also visit the Pixelmator site for more information at http://pixelmator.com
Step 1
Open the new Pixelmator 1.4 and place import an image to your document. I used an old image I had and I really don't know where I found it. If you know please let me know and I will credit the author.

Step 2
Duplicate the image layer and change the Blending to Overlay.

Step 3
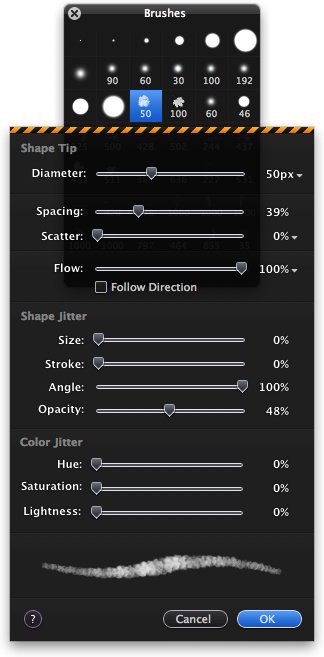
Now it's the coolest feature in this new version of Pixelmator, the Brush Engine. Go to View>Show Brushes. Then select the brush I selected in the image below. Just double click to edit it. You will have pretty much the same settings as in Photoshop. Change the Spacing to 40%, Scatter to 0%, Flow to 100%, Angle to 100% and Opacity to 50%. Use the image below for reference. With this brush we will create all the smoke and fire effects.
Step 4
Create a new layer, select black for the color and pick the Brush Tool (b). Start painting the first fireball, to do that go pressing the button and not holding the button, that way you can change a bit the direction and it will produce a less uniform effect. Also use the "[" and "]" to resize the brush. So you can make it bigger and smaller just to create a more realistic effect.

Step 5
Add another layer on top of the fireball layer and select grey for the color. Paint a smoke over the end of the fireball, exactly like the image below.

Step 6
Now create another layer and select orange for the color. Change the Blending of this layer to Multiply and paint over the fireball and grey smoke.

Step 7
Let's add another layer, keep the orange for the color and paint over the other smokes again. This time however, change the Blending of the layer to Color Dodge.

Step 8
Let's add another layer and, now, select white for the color. We'll create the highlights of the fire. Still using the same brush, reduce its size a bit and paint over. The Blending of this layer will be Color Dodge too.

Step 9
Add another layer, now let's create the shadows. Select black for the color and paint another smoke cloud, this time use Overlay for the Blending.

Step 10
Select the Lasso Tool (L) and create a marquee selection on the areas of the photo that are in front of the effects. After that select the fireball layer and go to Layer>Add Layer Mask.

Step 11
Select the all the layers used to create the fireball and fires and duplicate them. Then go to Layer>Merge Layer. Reduce its size going to Edit>Transform>Scale. Then change the Blending to 86%. Also use the mask feature to hide the areas that are supposed to be behind the plane.

Step 12
Using black and a new layer create more smoke. Change the size of the brush to make the smoke more realist so close to the ground make it much smaller. After that duplicate the layer and change the Blending to Multiply, that way the smoke will be much stronger. Remember, always use Mask to hide the areas behind the aircraft and the dude.

Step 13
Duplicate the big smoke layer you have just created and use the Perspective tool to create the shadow. Just go to Edit>Transform>Perspective and start distorting the new layer. Use the soldier's shadows for reference.

Step 14
Also create another smoke column using the brush tool.

Step 15
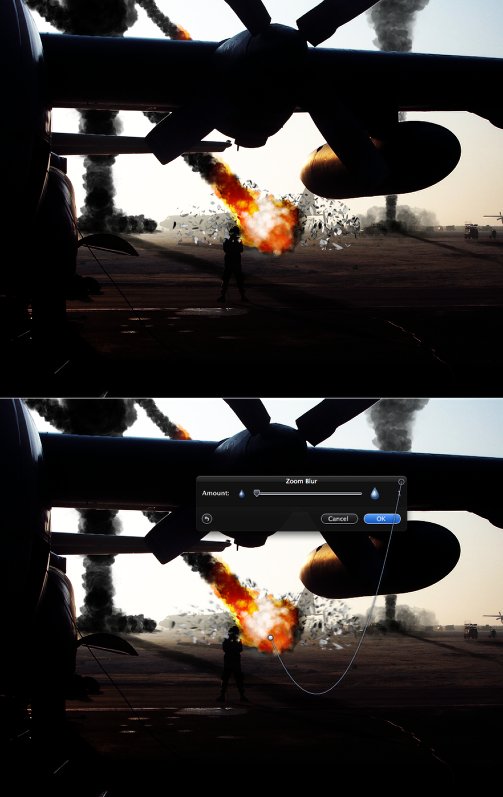
Here I used an image I created for the Flying Girl, it's an explosion I did using Cinema 4d. So basically I just imported the image and selected a part of it. Then I changed the size and used the Zoom Blur to create a nice explosion effect. After that just change the Blending to Multiply.
Step 16
Let's add another smoke column. Again with the brush tool create the smoke but make it a little curved to the right. Use Hard Light for the Blending.

Step 17
Add another layer and create smaller smokes close to the ground using black for the color.

Step 18
Now create another layer and paint some orange smokes. Use Color Dodge for the Blending.

Step 19
Finally, add another layer and paint more smoke this time use Multiply for the Blending.

Step 20
Create a new layer, behind all the smokes, just on over the Image layer and fill it with black. Select the Elliptical Marquee Tool (Y) and create an ellipse. Fill the ellipse with white and go to Filter>Blur>Gaussian Blur. Change the Blending to Color Dodge and you will have a sort of blast effect.

Step 21
Add another layer, this time in front of all the other layers. With the Gradient Tool (G) fill the layer with a gradient from Yellow to Black. Then just change the Blending to Overlay.

Conclusion
Now just add your logo and you will have a very nice apocalyptic image full of fireballs and smoke. We basicaly used only one brush and just played with colors and blend modes. It's really nice to see the guys over at Pixelmator working hard to improve this great image editor. The Brush Engine and the Clouds filter are great, I did this image last year in Photoshop and now in Pixelmator and I have to say, Pixelmator is much faster in terms of Filters like blurs. The Zoom blur is a greate example, it's in real time, while in Photoshop it's always a surprise the effect wil you will get.

Click on the Image for Full Preview
Download the Pixelmator File
Click here to download the Pixelmator file used for this tutorial

![Neon light effect in Photoshop [revisited]](/sites/default/files/styles/square_1x1/public/originals/hero_neon.png?itok=lP4mbIak "Neon light effect in Photoshop [revisited]")


