by abduzeedo
For the first tutorial of 2012 we wanted to have a really good one and the most important thing a very easy one because our goal for this new year is to provide good tutorials with simple techniques that achieve great outcomes. In this first case we will explore ways to create letterpress effect using Photoshop only.
So in this tutorial we will show you how to create a super easy and realistic letterpress effect using Layer Styles in Photoshop. The process is super simple and I am sure that you won't take more than 45 minutes to achieve the same result.
Step 1
Open Photoshop and create a new document. I am using 2560x1600 pixels for my so I can use this design as wallpaper. After that make sure you have a black background.
The secret to create a cool letterpress effect is to use different typefaces, sizes and styles next to one another. As you can see on the image below I started with the number 2012 and then add rectangles underneath each number. Adjust the rectangles depending on the typefaces. Try to make them slightly irregular in terms of alignment.

Step 2
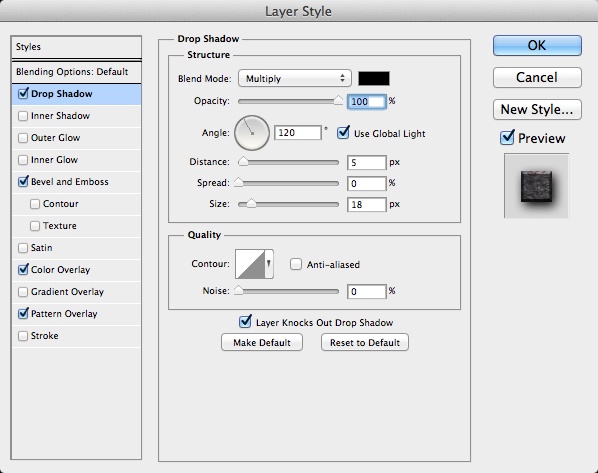
Select one of the rectangles and go to Layer>Layer Style>Drop Shadow. Use black for the color, multiply for the Blend Mode, 120 for the Angle, 5 pixels for the Distance and 18 pixels for the Size.
Step 3
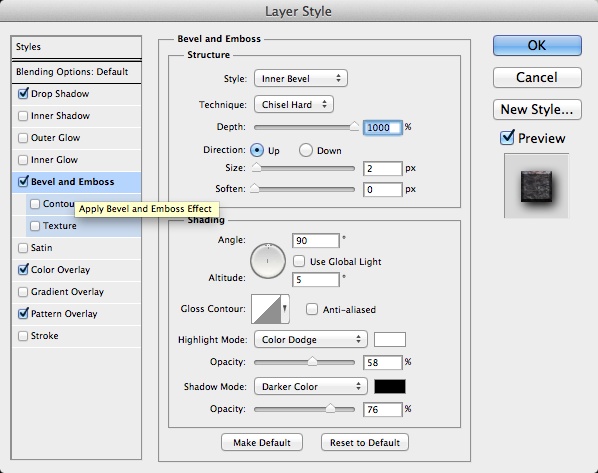
Select Bevel and Emboss now and then use Inner Bevel for the Style. Chisel Hard for the Technique, 1000 for the Depth, 2 for the Size, 90º for the Angle, 5º for the Altitude, White at 58% Opacity for the Highlight Mode with Color Dodge and black at 75% Opacity for the Shadow Mode using Darker Color.
Step 4
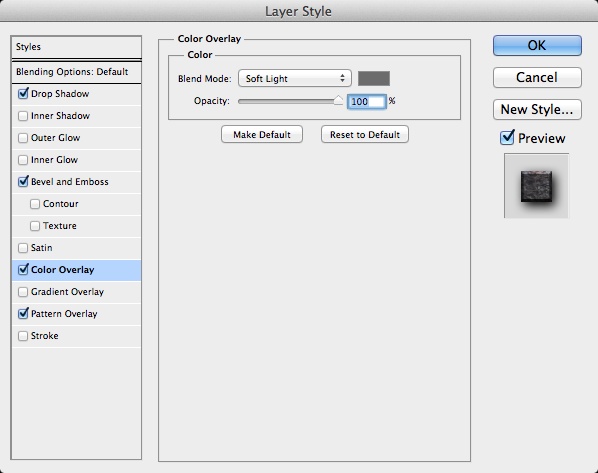
Select Color Overlay and then use Soft Light for the Blend Mode with a dark grey for the color. Here is the trick. For each rectangle use a different shade of grey so they won't look the same.
Step 5
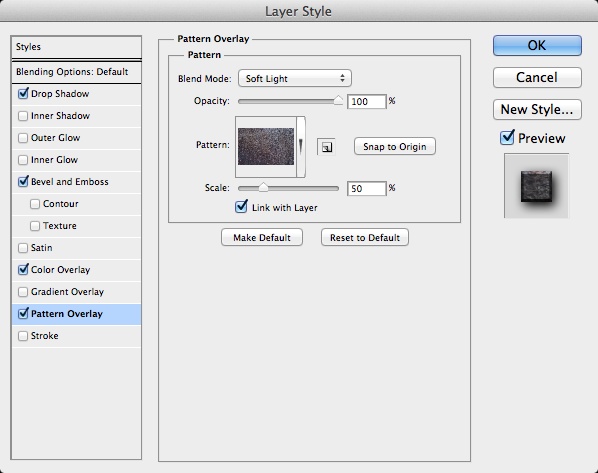
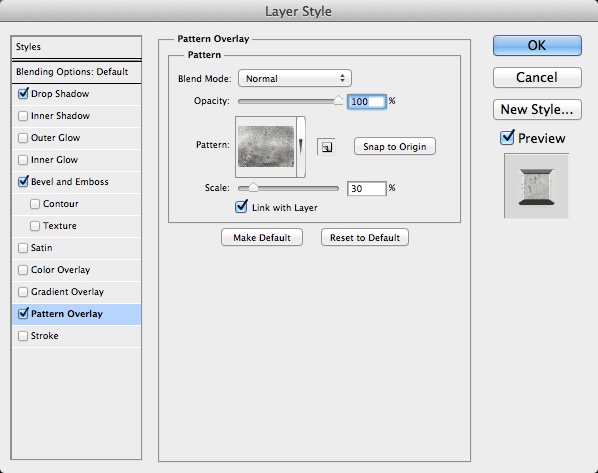
Select Pattern Overlay. Now it's a very important part. We need to have convincing texture to give a realistic look to our design. The texture I use is by Supertrooper called The surface of the old metal, visible rust. Courtesy of Shutterstock. So open this texture in Photoshop and go to Edit>Define Pattern. Then back to our design work, go back to the Pattern Overlay and click on the Pattern option. Select the one we just created from the photo. Change the Scale to 50%. This value will vary depending on the size of your pattern
Step 6
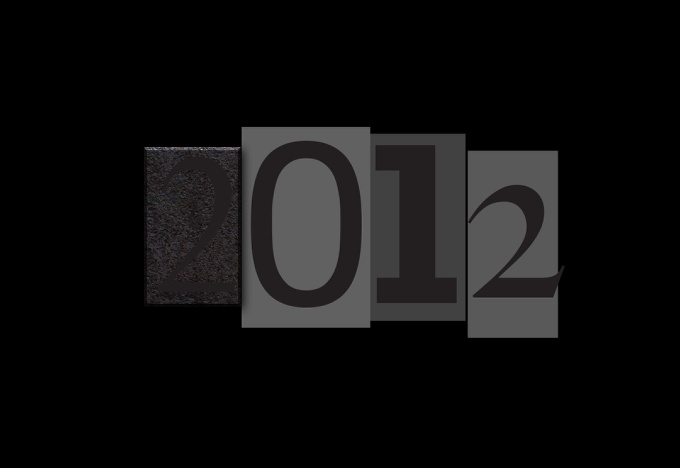
Here is the rectangle effect with the layer styles. Now let's work on the types.
Step 7
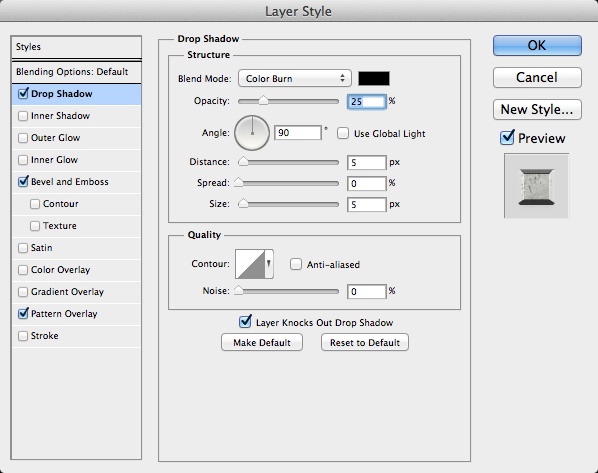
Select the number 2 and go to Layer>Layer Styles>Drop Shadow. Use black for the Color withe Color Burn for the Blend Mode at 25%. For the Angle use 90º with 5 pixes for the Distance, 0 for the Spread and 5 pixels for the Size.
Step 8
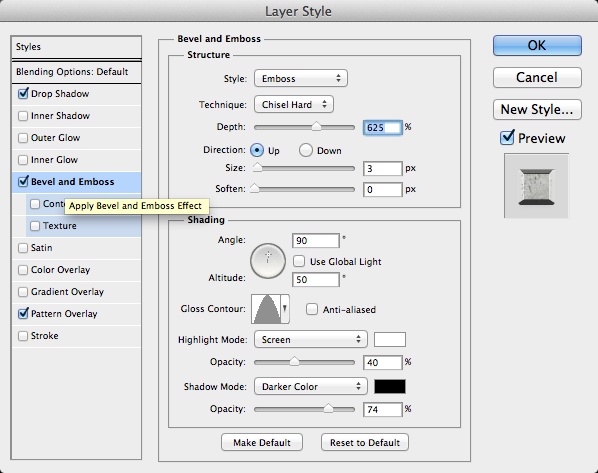
Select Bevel and Emboss. Use Emboss for the Style, Chisel Hard for the Technique, 625% for the Depth, Up for the Direction, 3 pixels for the Size, 0 for the Soften. Also use 90º for the Angle, 50º for Altitude. Then change the Gloss Contour using the one like I am using in the image below. For the Highlight Mode use Screen with white at 40% Opacity. For the Shadow Mode use Darker Color with black at 74% Opacity.
Step 9
For the pattern here let's use another texture. This one is by maxstockphoto and it's called Metal plate background texture. Courtesy by Shutterstock.
Step 10
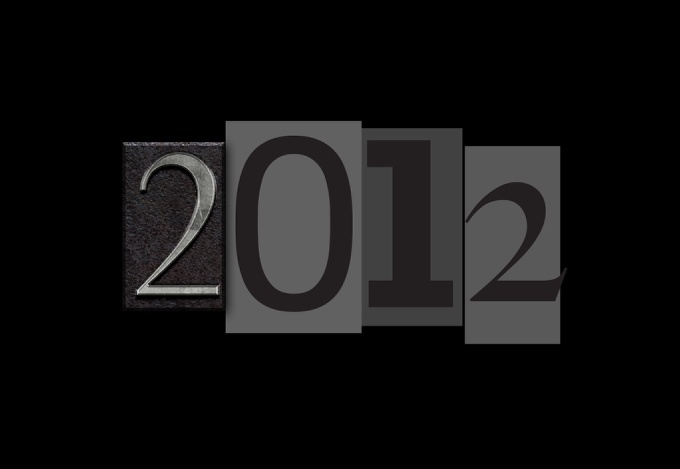
Here is the final result of the text effect with layer styles.
Step 11
Repeat the same steps for the other numbers.

Step 12
To make it a bit more realistic and old let's use some dirty brushes to destroy a bit of the rectangles. Select the rectangle and then go to Layer>Layer Mask>Reveal All. Then with the Brush Tool (B) and a grunge brush start paiting on the edges with black for the color. Use the image below for reference

Step 13
Here is how the effect will look like after apply the mask on the other rectangles.

Step 14
Repeat the same thing to add more words to your design. In my case I added Happy New Year 2012 and the Abduzeedo Symbol.

Step 15
Change the background layer to a radial gradient with a dark grey in the center.

Step 16
Copy the metal texture we used for the text and then paste right on top of the background layer. After that change the Blend Mode of the metal texture to Multiply.

Conclusion
You can select all layers and then duplicate them. After that merge all the new layers into a new one and apply a Gaussian Blur with 5 pixels for the Radius. Then just change the Blend Mode to Overlay at 70% Opacity. Duplicate the layer and change the Blend Mode to Screen at 40% opacity.
That is it! As I mentioned in the beginning of the tutorial, it's a very easy and straightforward technique but the result is quite nice. Now it's up to you to try it with different textures and colors. I would love to see some versions with white background as well.


