by abduzeedo
Last year I was learning how to use the 3D features in Photoshop and I did an image mixing a 3D robot with a photography and some dragons in vector. After quite sometime I was checking my images and found it, so I decided to write a tutorial showing how I did that. And, also play a bit more with the new 3D features in Adobe CS4.
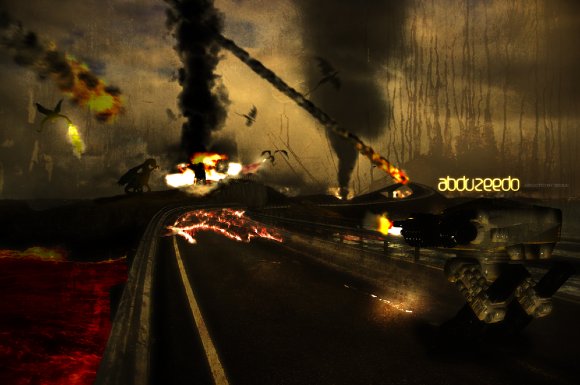
In this tutorial I will show you how to create an sort of video-game style image with dragons, fire, smoke, robots and other crazy things.
Step 1
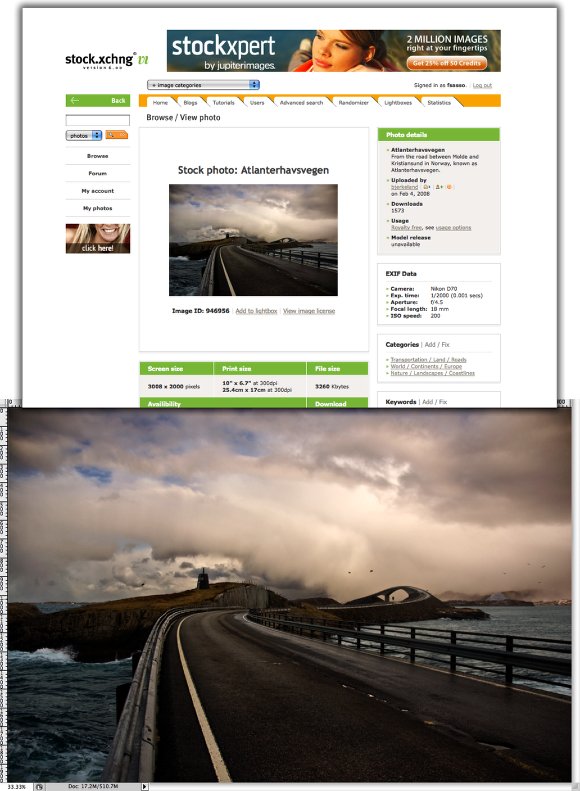
Create a new document in Photoshop and place a photo in the document. I used an image from sxh.hu, you can download it at http://www.sxc.hu/photo/946956
Step 2
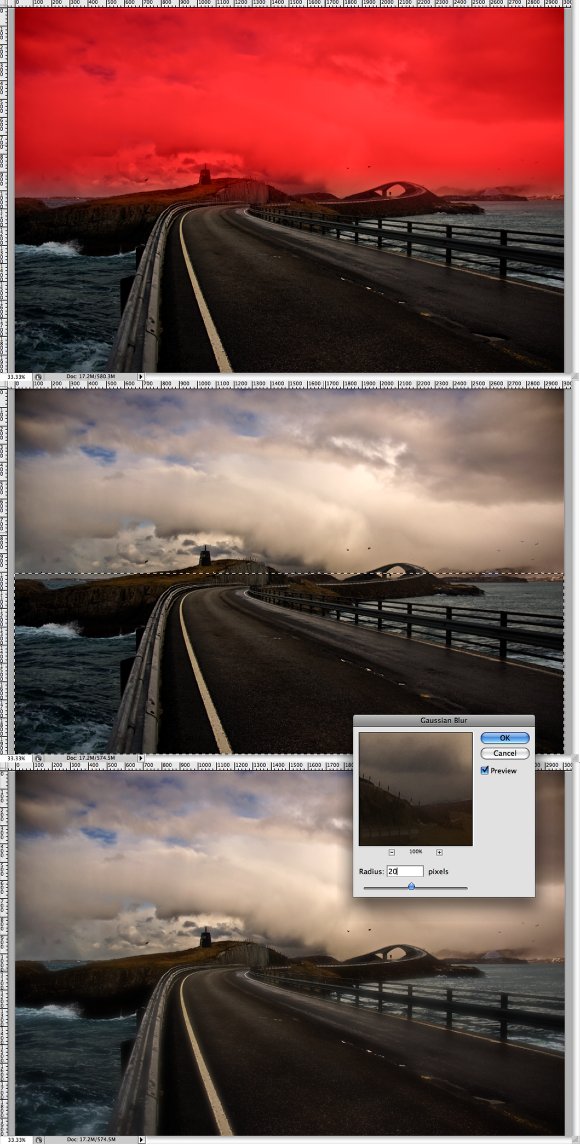
Duplicate the photo layer and press "Q" to switch to Quick Mask. Select the Gradient Tool (G) with black and white for the colors then paint a gradient. The black will become red and the white transparent, that means the red won't be affected and while the transparent will. Press "Q" again to transform the Quick Mask to selection and go to Filter>Blur>Gaussian Blur. Use 20 pixels for the Radius and change the layer Blend Mode to Lighten.
Step 3
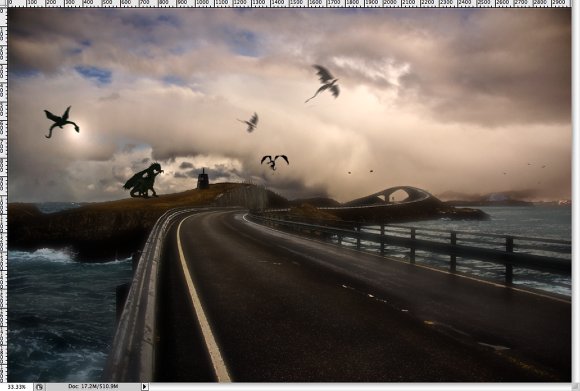
Here you will need some dragons. I used some vector dragons I have but you can find tons of dragons on the web. Apply Motion Blur in some dragons to give a nice impression, as if they are flying pretty fast.
Step 4
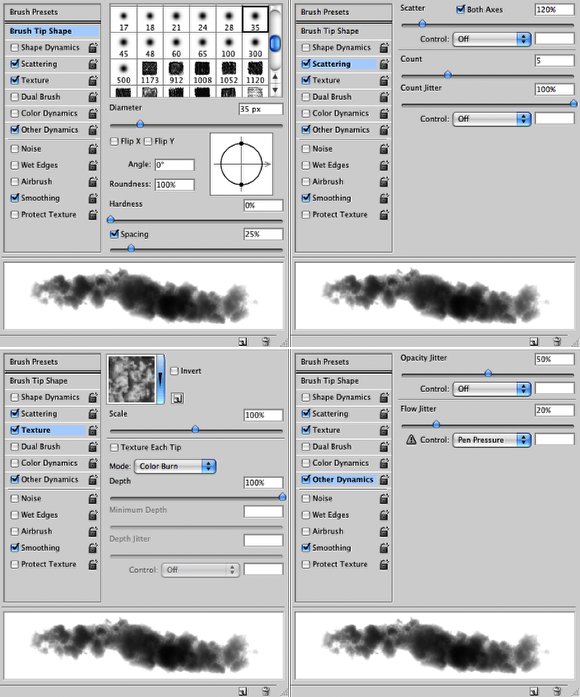
Now lets add some fire. Select the brush tool and go to the Brush Engine, Window>Brush. For the Brush Tip Shape, select a rounded brush and leave the default settings. Select Scattering and use 120% for the Scatter, 5 for the Count and 100% for the Count Jitter. Now the Texture is very important. Select the Clouds texture and change the Scale to 100%, make sure the mode is Color Burn. Also if you increase or reduce the size of the brush too much you will have to do the same with the texture scale. After that the last setting is Other Dynamics. Use 50% Opacity Jitter and 20% Flow Jitter. Save the brush as fire.
Step 5
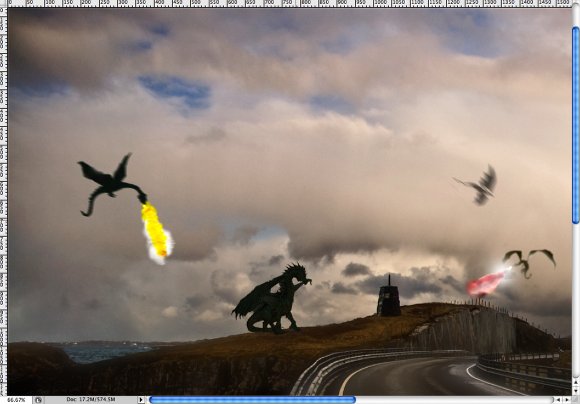
Using the brush you just created paint some fire. Use yellow and white for the colors and for the more distant ones use a dark orange or red and white. Also duplicate the fire layers and change the blend mode to screen adding some blur just to create a nice glow.
Step 6
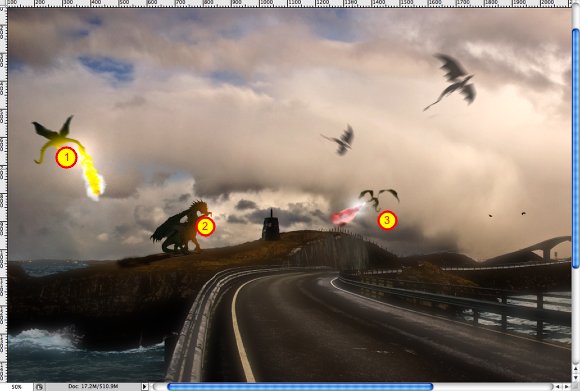
Now that we have fire lets illuminate the dragons. Use the clipping mask to paint just over the dragons. To do that create a new layer right on top of the dragon layer and go to Layer>Create Clipping Mask. Then with the Brush Tool (B) and yellow paint the area close to the dragons mouth. Also depending the angle try to illuminate the areas with the light coming from the fire in mind, ie 1, 2, and 3.
Step 7
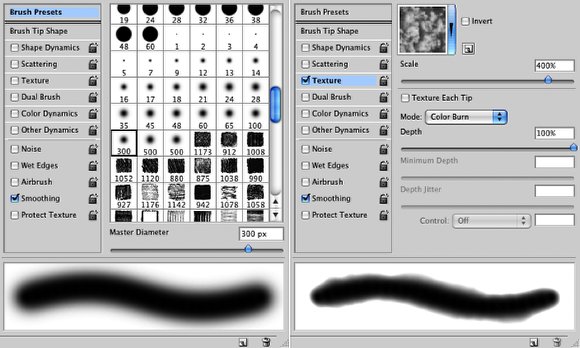
Here lets add some smoke from the fires. It's simple let's just create another brush, use pretty much the same settings as the first one we created but this time use a much bigger size. For the Brush use 300 and for the Texture Scale use 400%. After that save the brush, that's very important :)
Step 8
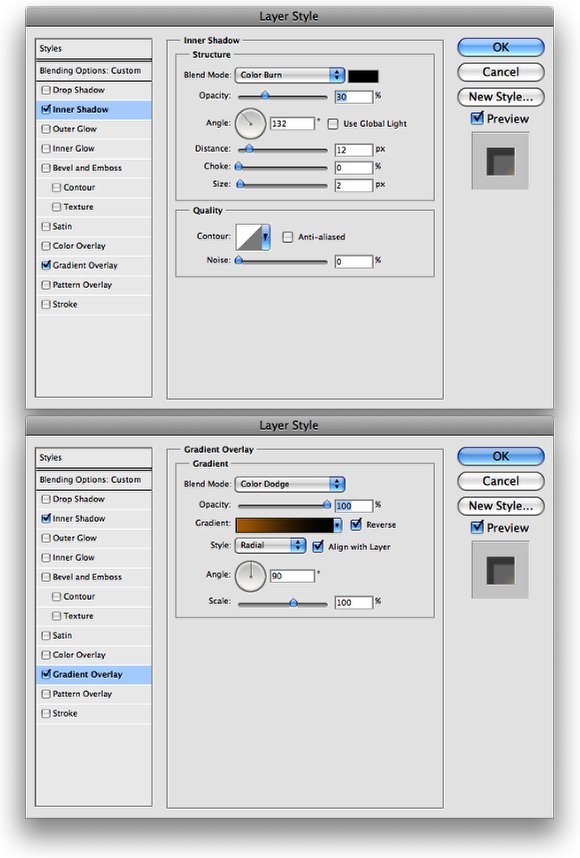
Now add a new layer and apply some Layer Styles. Use first Inner Shadow, then Gradient Overlay. Use the image below for reference.
Step 9
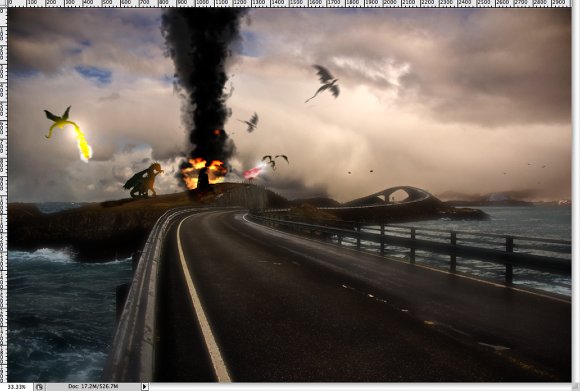
Start painting the smoke. Use the "[" and "]" to chang the size of the brush and the numbers keys to play with the opacity. Also use black for the color but at the bottom of the smoke change to white, the you will get some nice flames. Use the image below for reference.
Step 10
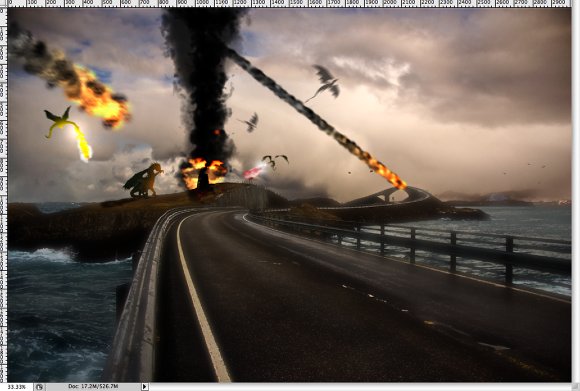
Last year I wrote a tutorial for Digital Arts Magazine where I showed how to create some fireballs. You can check that out at: http://www.digitalartsonline.co.uk/tutorials/index.cfm?featureID=1740
Basically the technique is pretty much the same we did to create the smoke, but you can use motion blur to add some movement to the object.
Step 11
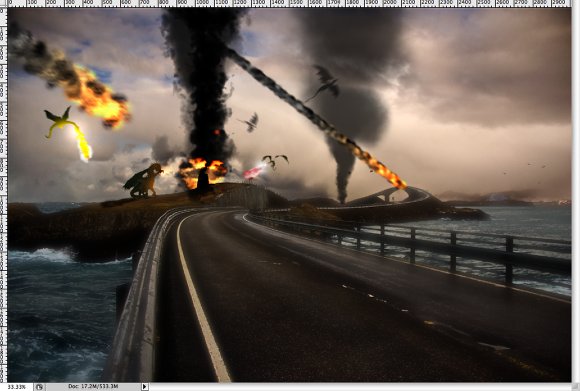
Add more smokes and fireballs to the image .
Step 12
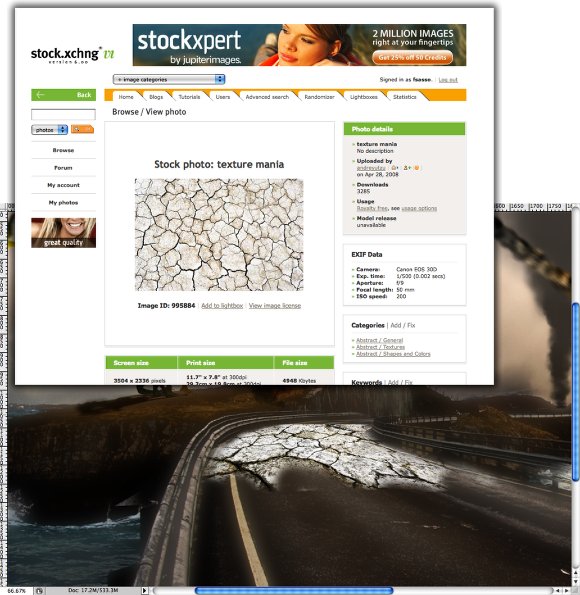
To create the cracks on the road let's use a photo, the one I used you can download it at: http://www.sxc.hu/photo/995884. After that go to Edit>Transform>Distort. Then try to apply the same perspective of the road to the image. After that select the Eraser Tool (E) and delete parts of the image to make it fit in the road area.
Step 13
After you erased some areas of the photo, change the layer's blend mode to multiply. You can duplicate the layer if you want to make it darker. Right after that duplicate the layer again and go to Image>Adjustments>Invert. Change the Blend Mode to Screen and go to Image>Adjustment>Hue and Saturation. Select the Colorize option and move the sliders until you get a nice red.
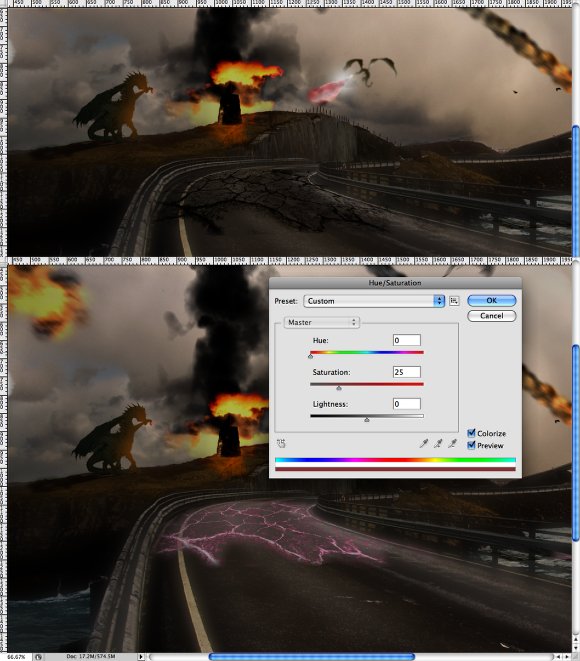
Step 14
Duplicate the layer you just applied the Hue and Saturation and change the Blend Mode to Color Dodge. After that go to Filter>Blur>Motion Blur. Use -90 Angle and 10 pixels for the Distance.
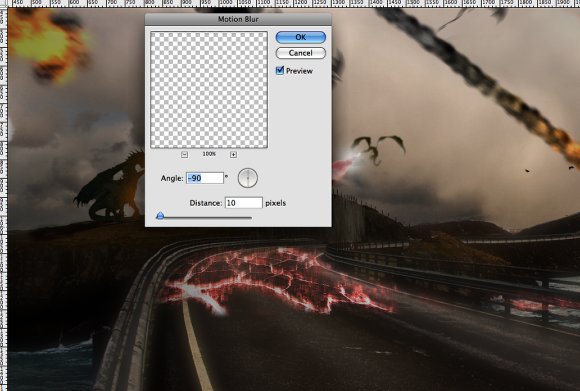
Step 15
Here let's add some more smoke and also paint the sea in red. To do the red sea, with the Pen Tool (P) create a shape with the exactly same area of the sea. Use red for the color and Color Burn for the Blend Mode. Duplicate the layer and change the Blend Mode to Color Dodge.
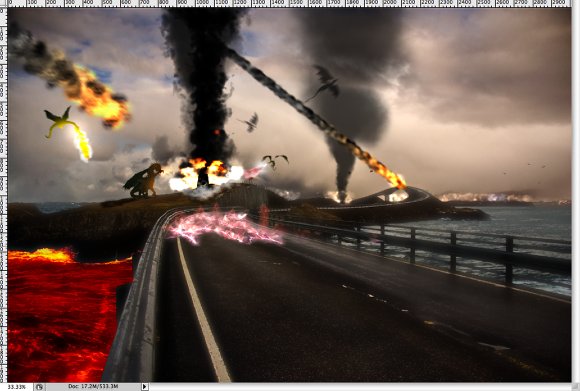
Step 16
Here let's play with the new 3D features in Photoshop. You will need Photoshop CS3 to import and rotate 3D objects, and the CS4 for the light features. Go to 3D>New Layer from 3D File. Then choose the 3D file you want to import. I used one I found at http://artist-3d.com/free_3d_models/dnm/model_disp.php?uid=487&ad=08military_weapons.php&count=count
To rotate end scale the 3D object use the 3D tools (K). Place the Robot on the road, use the image below for reference.
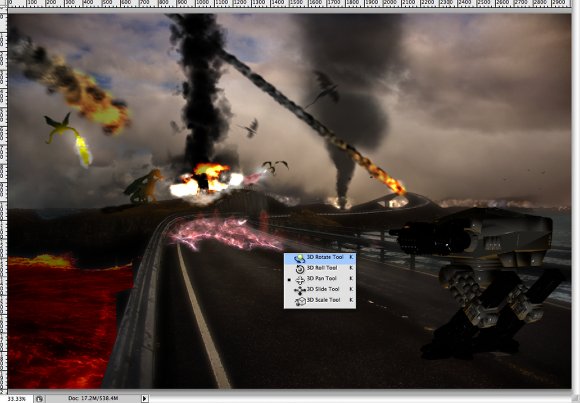
Step 17
Go to Window>3D to open the 3D settings. You can Add, delete, and edit lights, the 3D hierarchy, and much more. Let's add a Spot lightt first. Use 1 for the intensity, white for the color, select the Create Shadows option, and use 31.5º for the Hotspot Angle and 45º for the Fallof. For the Infinite Light 1, chang the color to yellow, and for the Infinite Light 2 change the color to 50% grey. Also add a new layer beneath the robot layer then with the Brush Tool (B) and a regular brush with black color paint the robot's shadow.
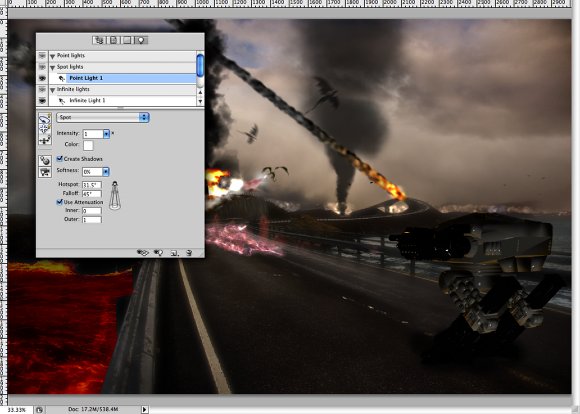
Step 18
Duplicate the Robot's layer and rasterize it. Go to Layer>Rasterize>3D. Then go to Filter>Blur>Gaussian Blur. Use 14 pixels for the Radius. After that change the Blend Mode to Screen and the opacity to 70%, it will add a nice glowing effect. Also with the Brush Tool (B), select the fire brush and paint some fire coming from the robot's gun, in a new layer too.
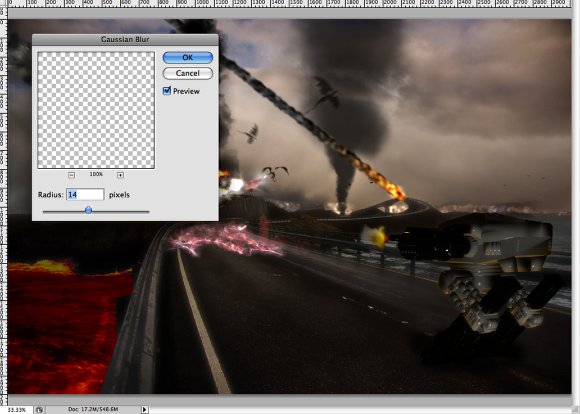
Step 19
Select the Robot layer and go to Filter>Noise>Add Noise. Use 10% for the Amount and Uniform for the Distribution. After that add a new layer and fill it with black. Change the layer's Blend Mode to Color Dodge and with the Brush Tool (B) use a regular brush with white and paint the floor being illuminated by the machine gun fire.
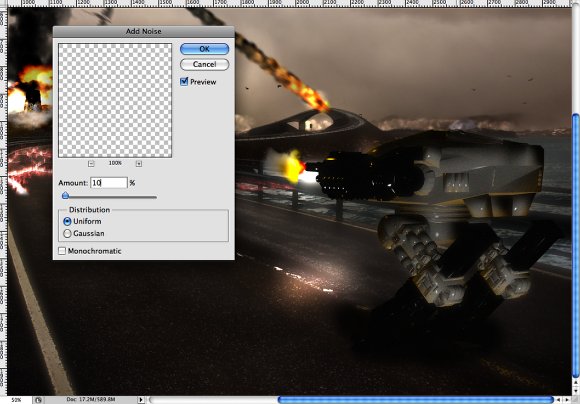
Step 20
Let's add some textures to our design. I used a photo of a concrete wall, I really don't remember where I got that image, but you can find good ones at sxc.hu, dezignus and bittbox.com as well. Place the texture on top of the other layer and change the Blend Mode to Overlay with 20% Opacity. Duplicate the texture layer and change the Blend Mode to Color Burn with 10% opacity.
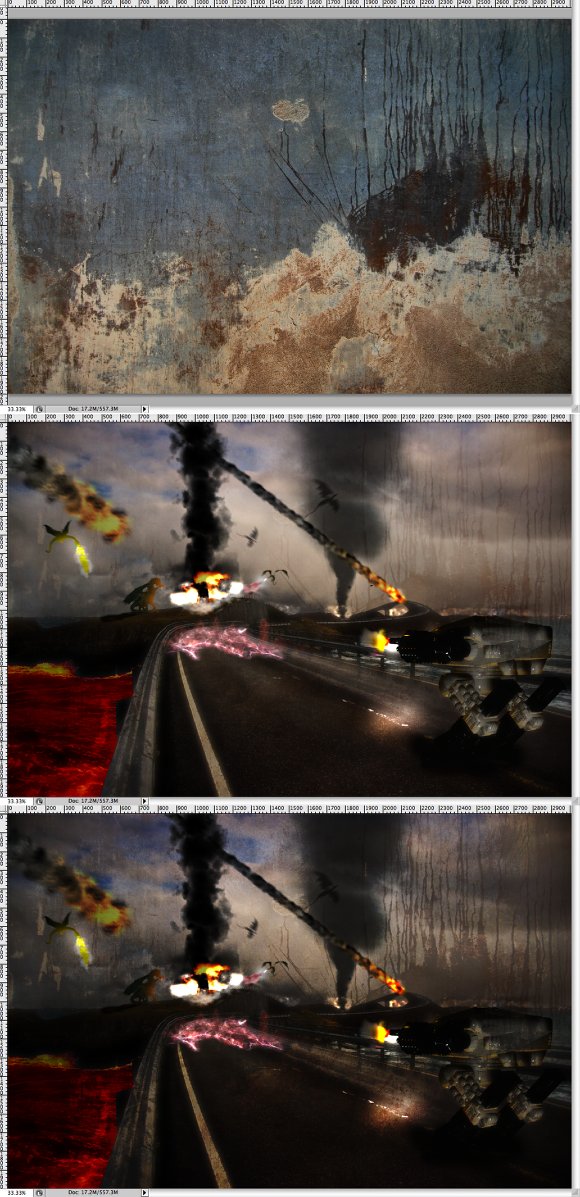
Step 21
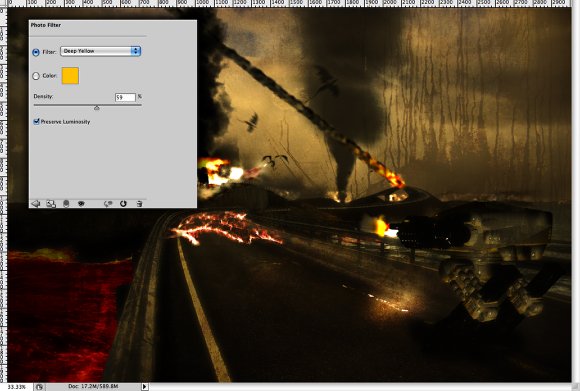
Go to Layer>New Adjustment Layer>Photo Filter. Use Deep Yellow for the Filter and 60% Density.
Conclusion
You can add more textures or another Gradient Fill over the layers if you want to make it darker too. The idea of this image was just an exercise to understand how the 3D layer works in Photoshop. Also we mix a few other techniques from other tutorials and that makes everything easier. That's for me is the best thing about tutorials, not the end result but the effects we learn so we can apply then pretty quickly on other designs.
Conclusion
Click here to download the Photoshop File used for this tutorial
![Neon light effect in Photoshop [revisited] Neon light effect in Photoshop [revisited]](/sites/default/files/styles/square_1x1/public/originals/hero_neon.png?itok=lP4mbIak)
